INSTALLATION AND OPERATION
TABLE OF CONTENT
BEFORE USING YOUR WATCHPAX 64
Please read the manual thoroughly before operation. Always check that the unit has not been damaged in transit when you take delivery. >IMPORTANT: The WATCHPAX 64 is a plug-and-play unit. Do not open, modify or repair the unit yourself. Opening, modifying (software or hardware) or repairing the unit yourself willl invalidate the warranty and presents a risk for the user.
SAFETY FIRST
- Insert the power plug all the way in, so it is not loose.
- Do not place the power cord or product near heat sources.
- Caution: shock hazard if handled carelessly or inaccurately.
- The unit shall be connected to a grounded outlet.
- Do not use a damaged power cord or plug.
- Do not touch the power plug with wet hands.
- Do not install the product in a narrow space and/or where there is bad ventilation. Do not block the ventilation in any way when operated.
- Always keep plastic packaging away from children.
- Do not install the product on an unstable or vibrating surface.
- Install the unit in a clean, dry area without excessive particles or dust, in the air (preferably in an air-conditioned server room). Do not install the product in a place where it is exposed to high temperature, chemicals, dust, moisture, oil or smoke as this may seriously affect its performance and lifetime.
- Take care not to drop the product when moving it.
- When installing the product on a shelf, ensure the bottom edge of the product does not protrude to avoid tipping, for example.
- To move the product, first disconnect all the cables from it.
- The wall socket should be easily accessible for pluggable equipment.
- High voltage runs through the product. Do not attempt to disassemble, repair, or modify the product on your own.
- If the product generates a burning smell, or smoke, remove the power cords immediately and contact Dataton.
- If the product falls, or the exterior is damaged, power off the product, remove the power cords and contact Dataton.
- If there is a risk of thunderstorm or lightning strike, turn off the power and disconnect all cables.
- Do not insert a metallic object or inflammable object into any opening of the product.
- Unplug this product from the AC power supply before cleaning. Do not use liquid or aerosol cleaners on the product. Use a microfiber cloth for cleaning.
- After storage in cold conditions, let the product adapt to normal temperature for two hours before powering on.
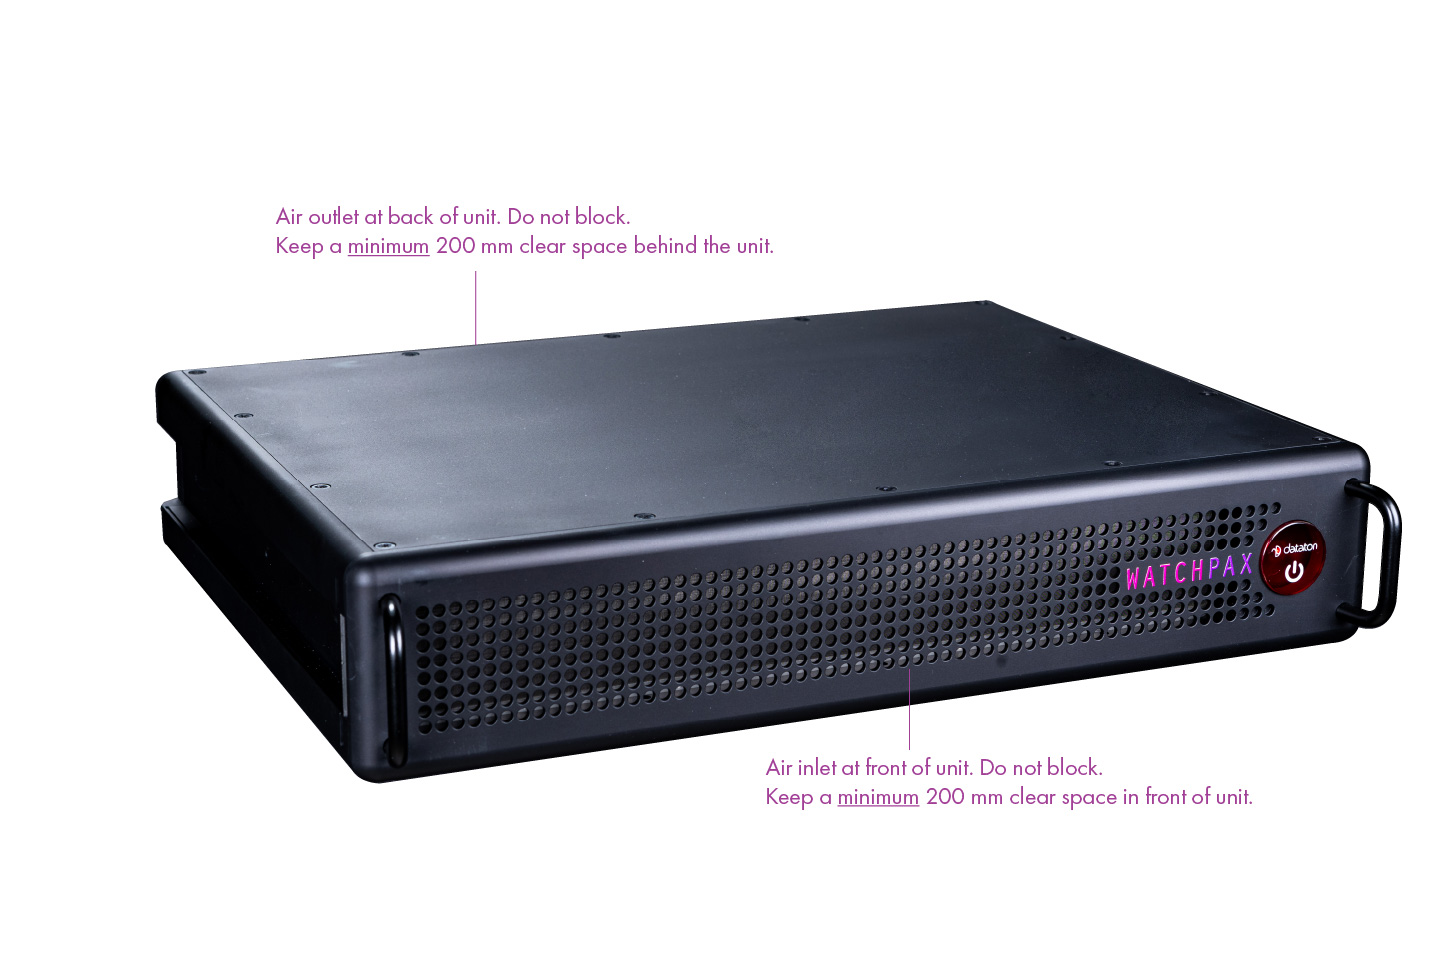
VENTILATION
Airflow is critical for the correct operation of WATCHPAX 64. Do not block front or back of the unit. In any installation, there should always be a minimum of 200 mm clear space at front and 200 mm behind the unit.
The air filter can be manually removed from the unit for cleaning purposes. Recommended method for cleaning the filter is with a vacuum cleaner and/or by rinsing it with warm water. Make sure the filter is dry before reinserting it into the WATCHPAX 64.
INSTALLATION
GENERAL
- This equipment is for professional use for installation at locations where only adults are normally present. Check the “Safety First” list before use.
- The WATCHOUT 64 must be connected to a properly grounded wall socket (a socket-outlet with protective earth connection in the building).
- The serial number is located on the base of the unit.
IMPORTANT: Only use the power cord supplied with the WATCHPAX 64 unit, otherwise Dataton AB cannot guarantee full functionality.
STANDALONE INSTALLATION
Place the unit flat with the base down. Mount the four self-adhesive rubber feet (supplied) at the points indigated on the base of the unit.
INSTALLATION IN 19-INCH RACK
The WATCHPAX 64 unit may be mounted in a 19-inch rack by using the optional rack kit. Please refer to separate instructions for rack assembly.
POWER ON
The WATCHPAX 64 unit is switched on by inserting the power cord or inserting the power cord and using the on/off switch. (see Connectors in the Introduction). Wake-on-LAN (WOL) may also be used with other units that support it.
FIRST POWER ON
The first time you power up a WATCHPAX 64 (after delivery or after a reset) the system will finalize installation and reboot several times. This procedure will typically take about 5 minutes to complete.
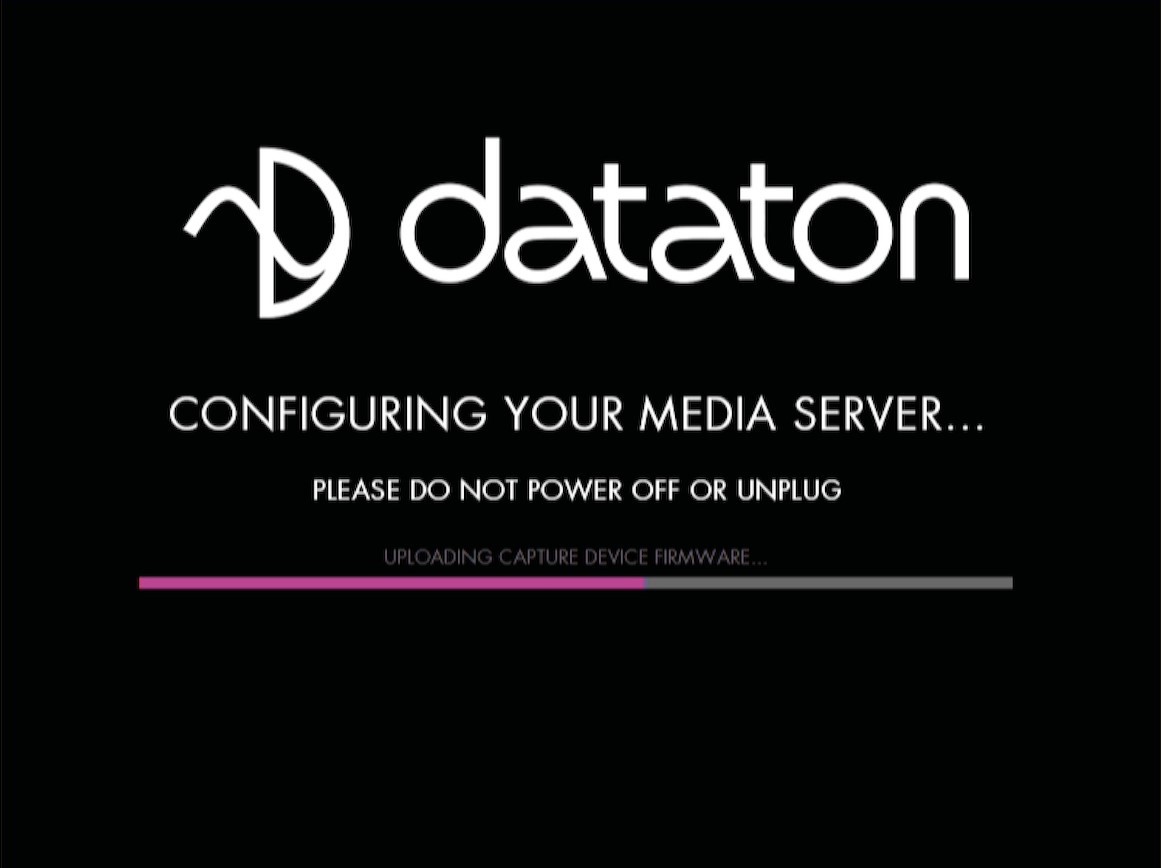
IMPORTANT: Do not interrupt this procedure.
POWER OFF
Powering down should be initiated from within WATCHOUT Producer software.
When the power-off sequence is complete, the fans will turn off, and the power cord may be removed.
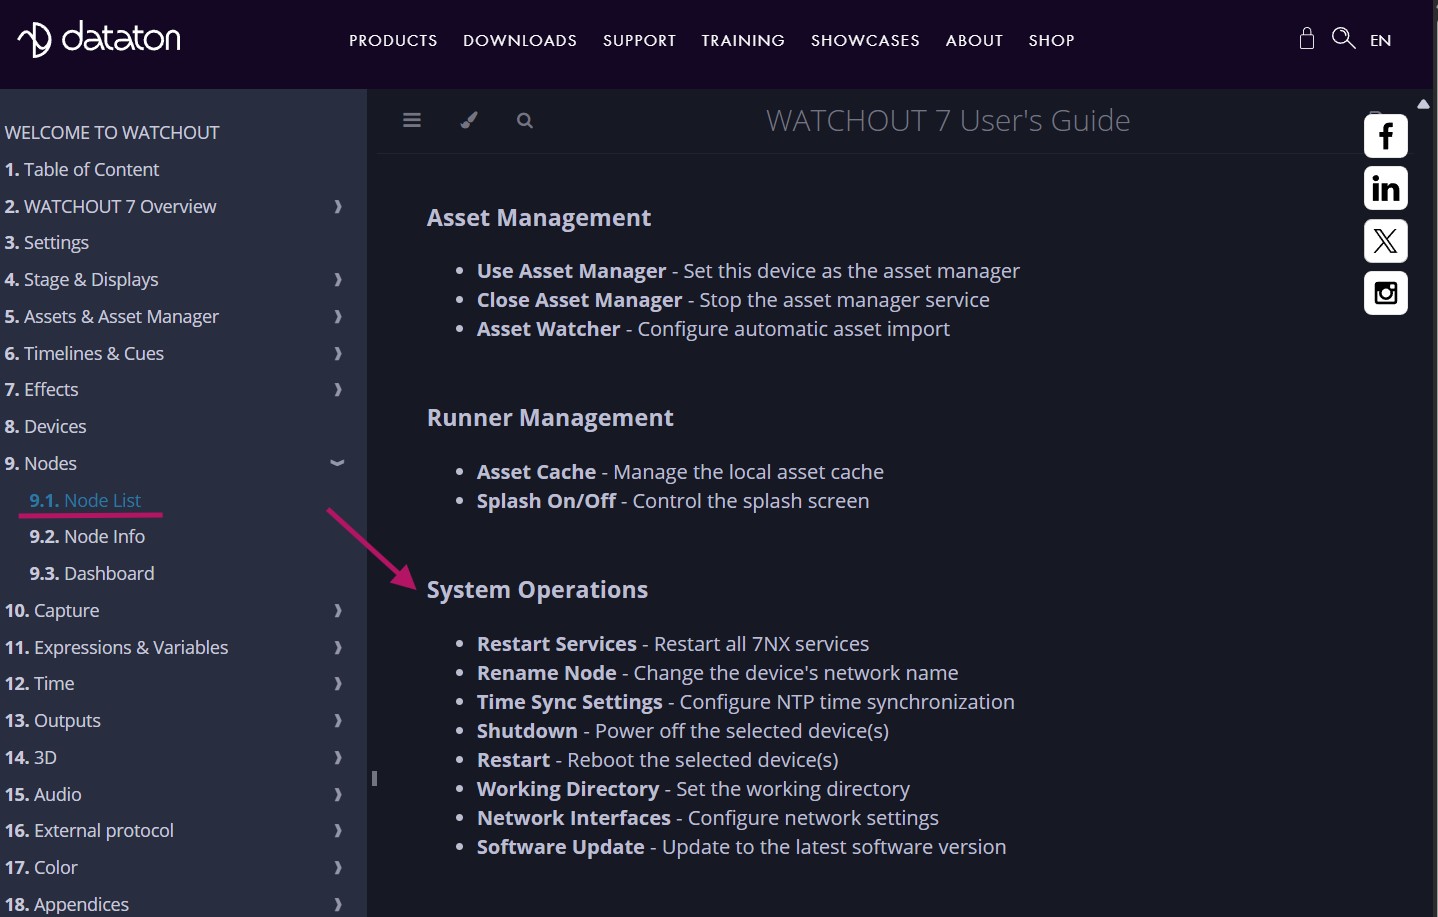
To power the unit down from within the WATCHOUT 7 Producer software, do the following: In the Nodes window, right click on your display device (the WATCHPAX 64 in this case) and select Shutdown. For more information, please refer to chapter 9.1: Node List in the "WATCHOUT 7 User's Guide".
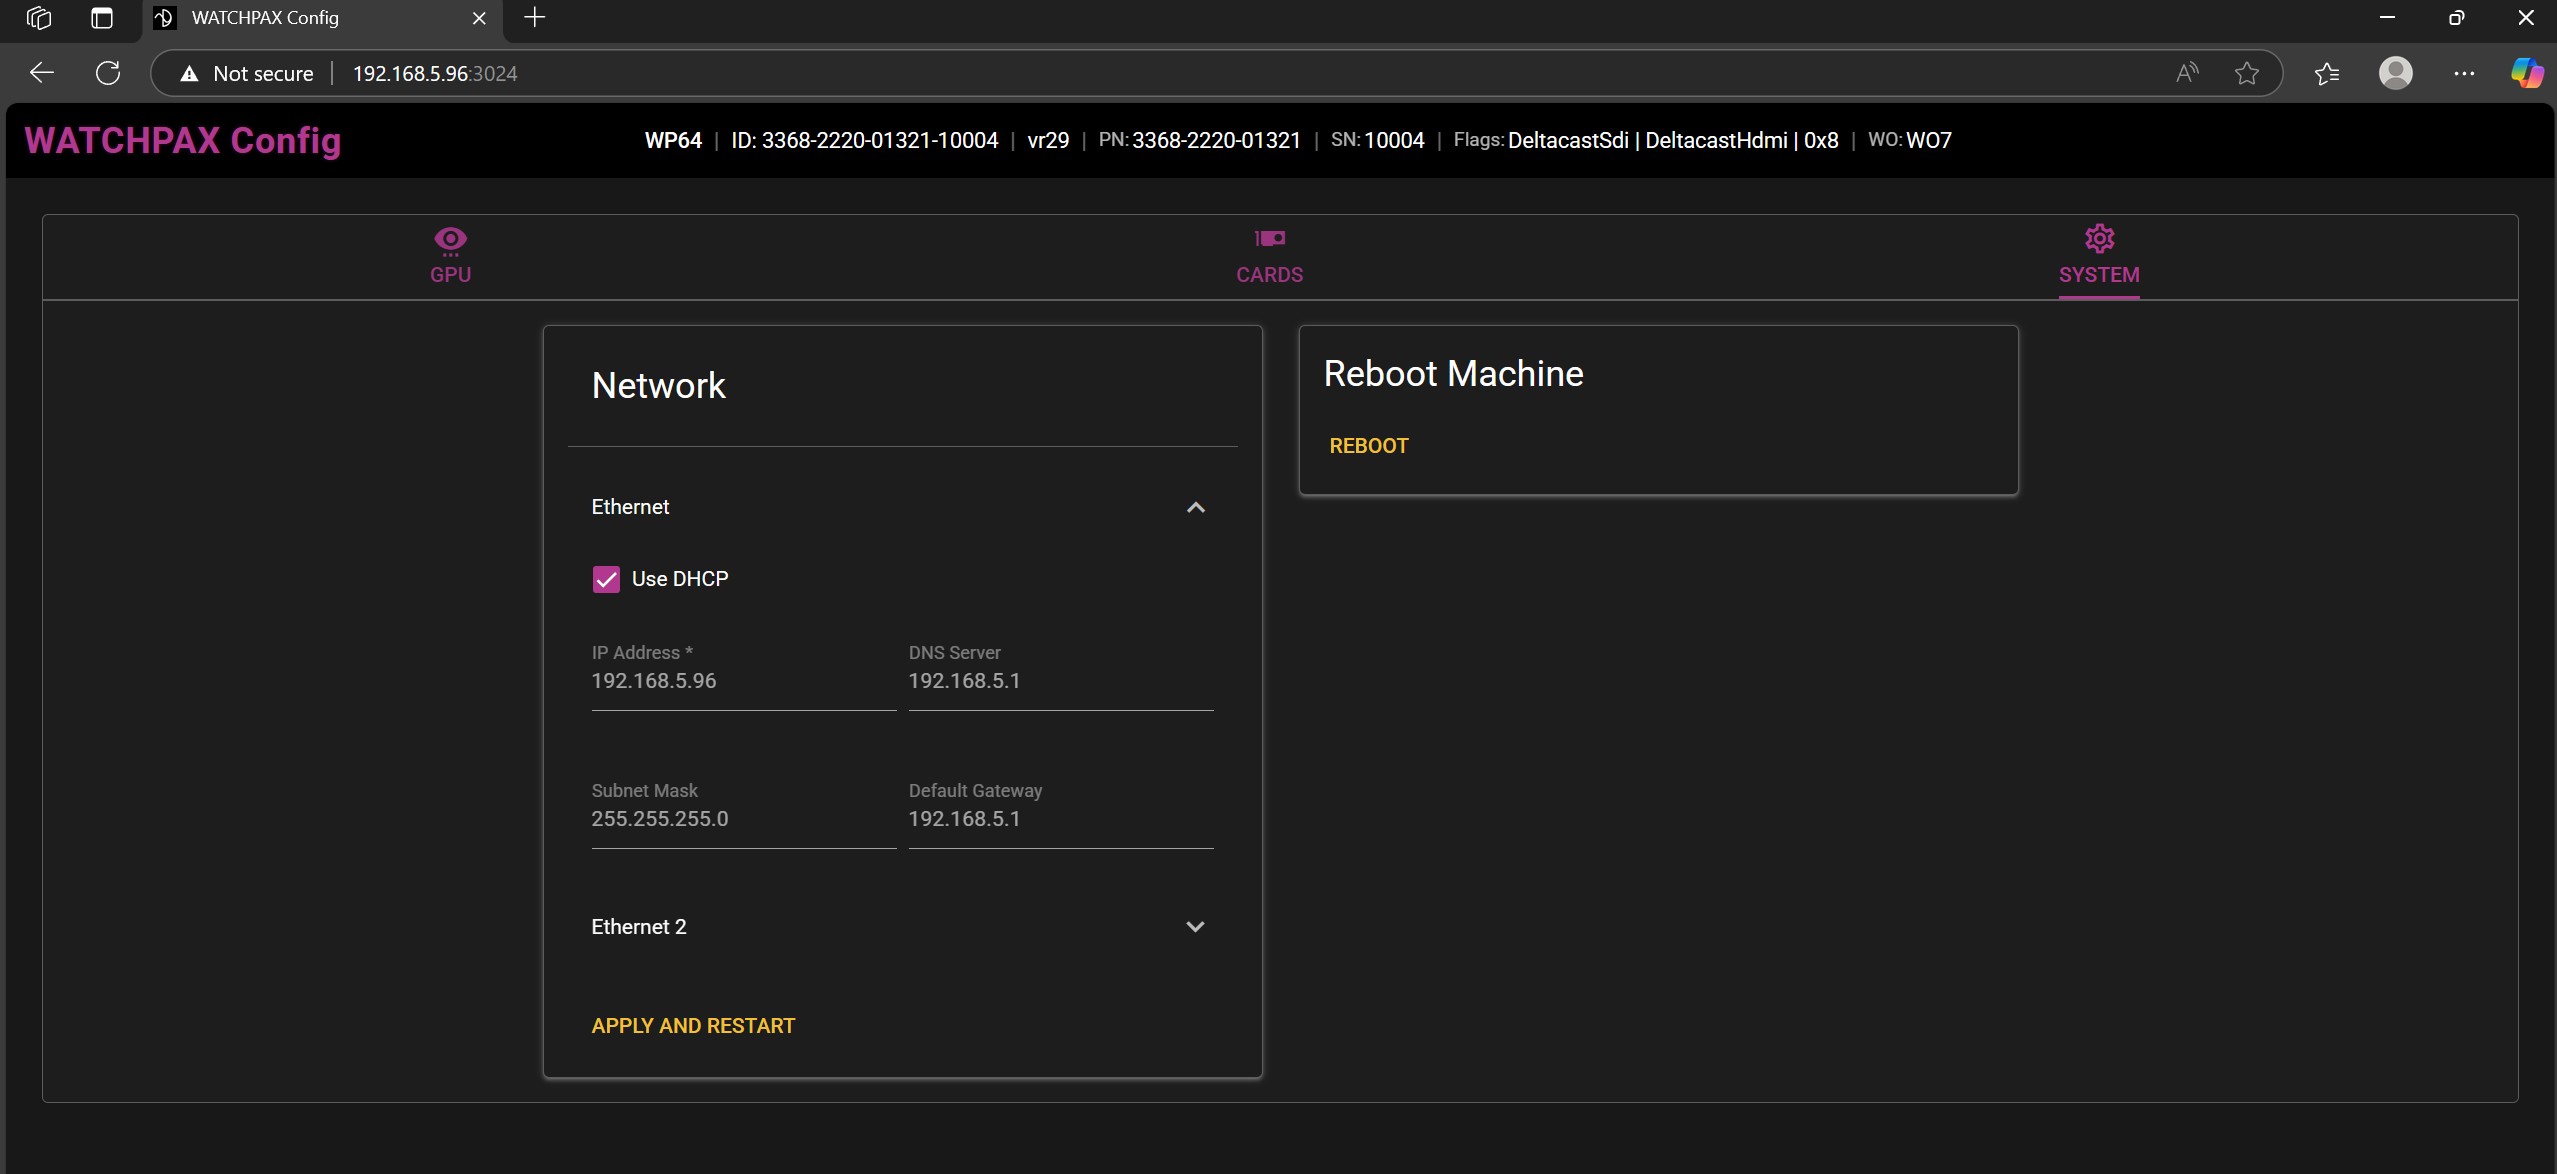
It is also possible to power the unit down from WATCHPAX Config, a network-based UI.
NOTE: If you are unable to shut down via the software, you can force shutdown with the power button as a last resort. Please be aware that this may cause data loss and system corruption. To force shutdown in this way, press and hold the power button located on the front of the media server (see Connectors in the Introduction) for at least 5 seconds. The light will then turn off and the power is cut.
IMPORTANT: Do not unplug the power cord during power-off, as this may cause data loss and system corruption.
QUICK START
- Connect displays to the WATCHPAX 64 using the DisplayPort outputs.
- Connect the WATCHPAX 64 to the network using one of the Ethernet ports.
- Power on the WATCHPAX 64.
- Start the WATCHOUT Producer software on the production computer, which is on the same network. Make sure you are using WATCHOUT version 7.
RESET WATCHPAX 64
There are occasions when you may want to reset a WATCHPAX 64, for example, if the unit has been corrupted, or if it is a rental unit and user-specific info has to be removed between rentals. There are two levels of reset:
- Reset and keep user data. This resets the operating system, display, GPU and capture settings but retains user data, such as shows and media.
- Reset to factory settings. This takes the unit all the way back to the original factory settings and you lose all user data.
IMPORTANT: A reset, regardless of level, is an advanced measure. Make sure you are fully aware of what data you lose when you reset!
RESET AND KEEP USER DATA
This option resets the system partitions but keeps all user data such as:
- Shows
- Media
- WATCHOUT settings
- Startup script
- Network settings
- Timecode settings
Driver-related settings will be reset to default factory settings such as:
- Display settings
- Display mode
RESET TO FACTORY SETTINGS
This resets all partitions to factory settings and all user data will be lost. This level of reset is suitable when you want to remove all settings between projects.
RESET PROCEDURE
The reset menu is hidden by design in order to avoid accidental resets or misuse. To reset your WATCHPAX 64 device, follow these steps:
- Power off the WATCHPAX 64.
- Disconnect any USB devices.
- Now connect a keyboard to one of the USB ports.
- Connect at least one display device to a DisplayPort output.
- Power on the WATCHPAX 64.
- During startup, you will see a five-second countdown in the top left corner of the display. Press Esc during this countdown.

NOTE: If you don’t see a counter, it means the display device is slow to lock to the output. In that case, press Esc repeatedly after power-on to move to the menu below.
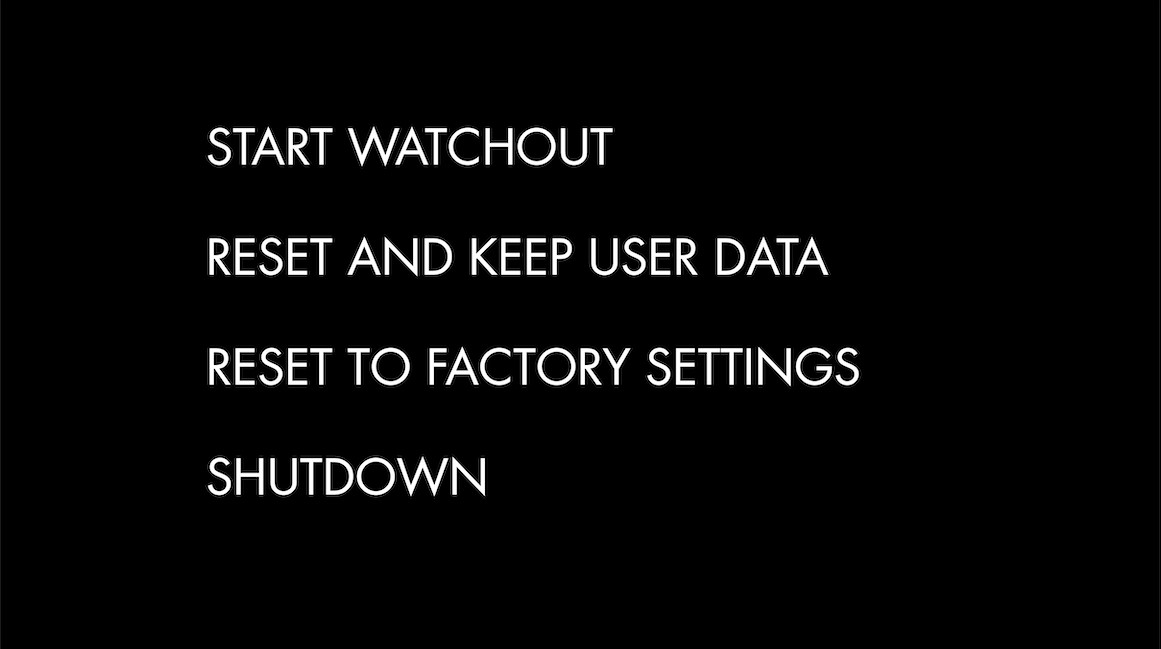
- Select the desired reset option in the menu that appears, and press Enter.
IMPORTANT: There will be no confirmation – the reset process starts immediately!
- As noted above, the reset process starts immediately, providing some visual feedback.
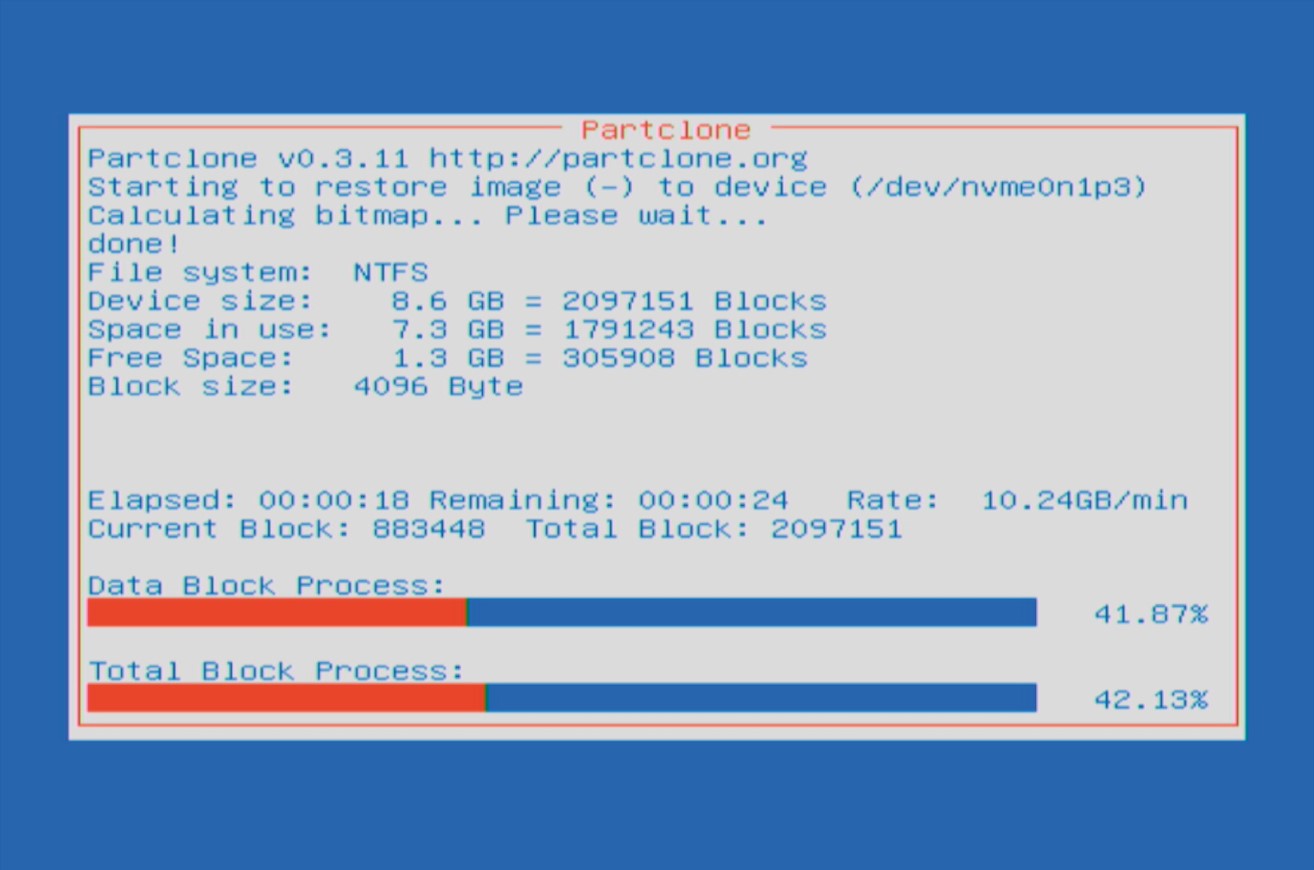
- The WATCHPAX 64 will restart several times in order to configure the operating system and hardware.

IMPORTANT: Do not power off the unit during the configuration process!
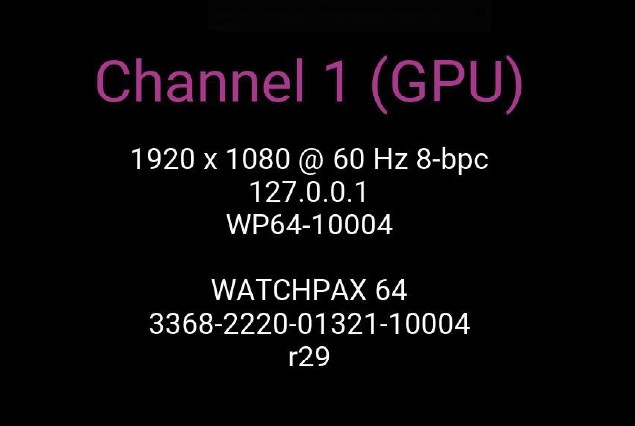
- WATCHOUT will start when the process is complete. The system image version will be appended after the serial number.
MISCELLANEOUS
AUDIO
The WATCHPAX 64 is Dante® ready, meaning that a Dante® license can be purchased and activated on the unit, by the user. Instructions for this can be found in the knowledge base on the Dataton website.
Digital audio output formats:
WATCHPAX 64 can output multi-channel (7.1) LPCM audio embedded with DisplayPort and HDMI.
DIGITAL AUDIO OUTPUT RATES
- 44.1 kHz
- 48 kHz
- 88.2 kHz
- 96 kHz
- 176.4 kHz
- 192 kHz
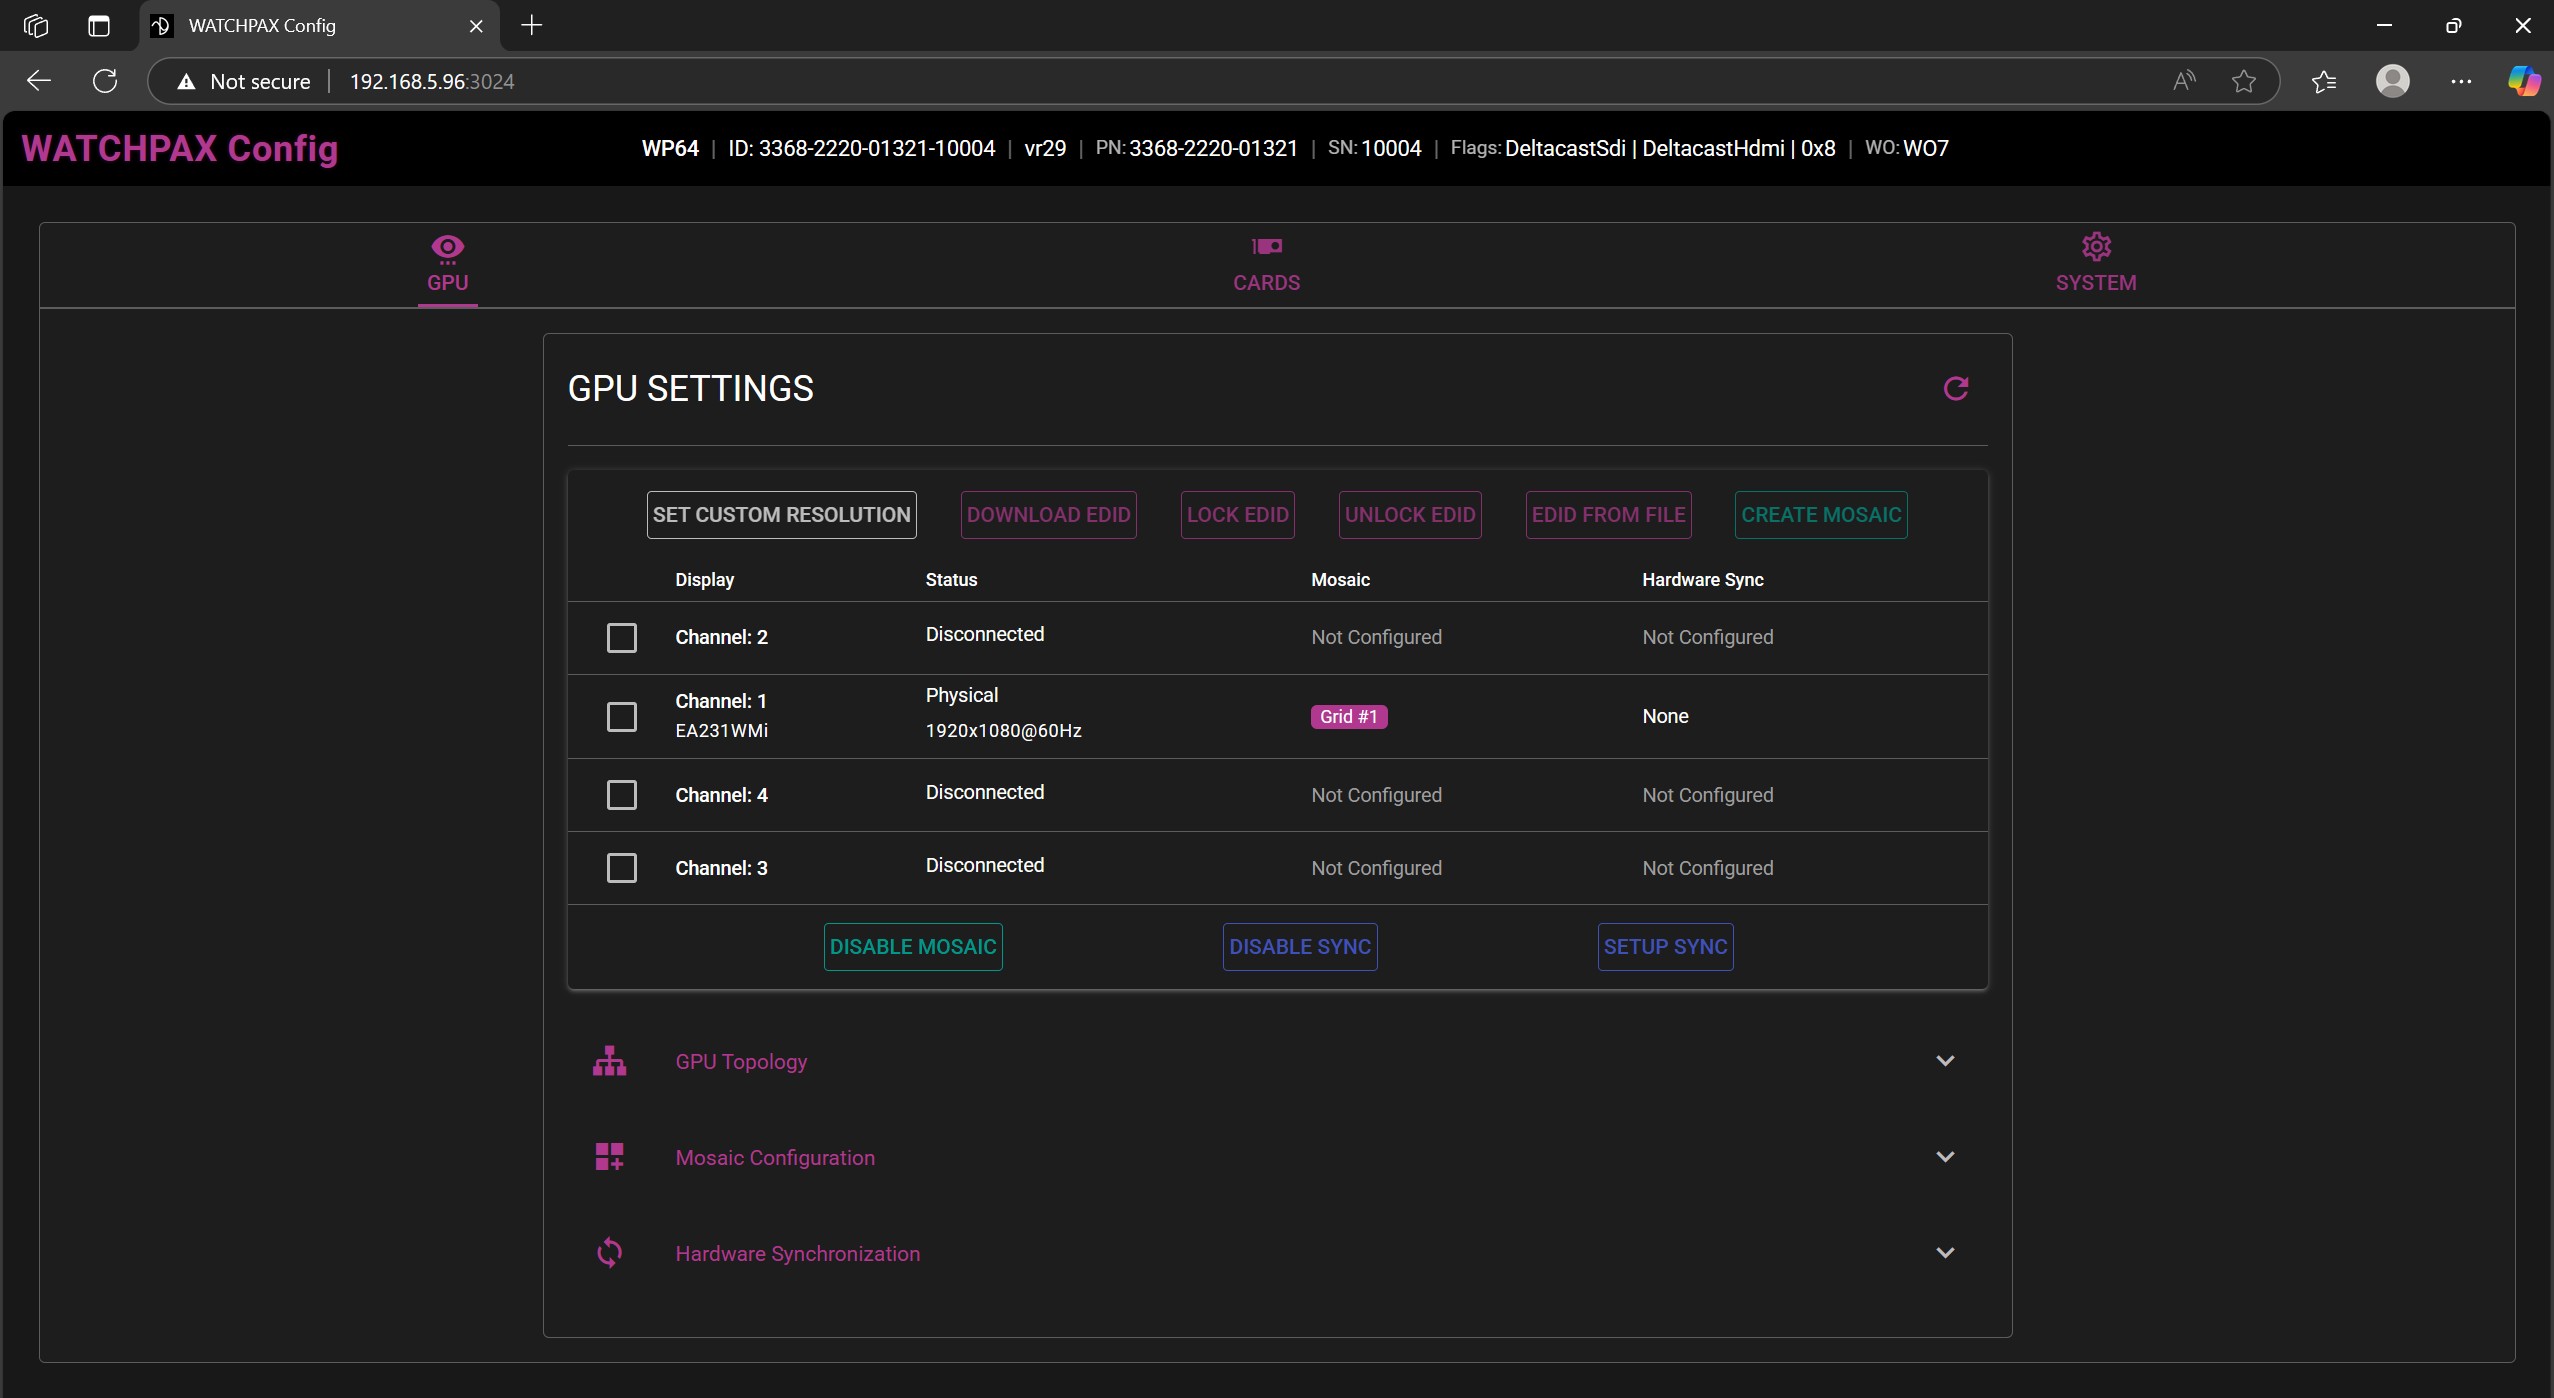
WATCHPAX Config
WATCHPAX Config is a user interface that can be accessed and utilized through a web browser, so long as the WATCHPAX 64 and the computer running the Producer software are on the same network. To access the user interface, enter the ip address of the WATCHPAX 64, followed by ":3024" into the web browser's search bar (e.g. 192.168.5.64:3024).
In this user interface you can access different settings, such as mosaic configurations, EDID read/capture, the GPU topology and display configurations. For more info on how to set these features up, see the Synchronization chapter.
IP address settings can also be accessed from WATCHPAX Config, for setting of static IP addresses.