DATATON WATCHPAX 30
USER'S GUIDE
PREFACE
© Copyright 2024 DATATON AB (“Dataton”). All rights reserved.
Dataton, the Dataton logo, WATCHOUT and WATCHPAX are registered trademarks of DATATON AB. All other company and product names are trademarks or registered trademarks of their respective owners. Use of a term in this publication should not be regarded as affecting the validity of any trademark.
Dante is a registered trademark of Audinate Pty Ltd.
NOTCH is a registered trademark of 10 bit FX.
The information in this guide has been carefully checked and is believed to be accurate.
However, Dataton assumes no responsibility for any inaccuracies or errors in this manual or the products described. In no event will Dataton be liable for direct, indirect, special, incidental, or consequential damages resulting from any defect or omission in this manual, even if advised of the possibility of such damages. The technical information contained herein regarding features and specifications is subject to change without notice. Products or manufacturers mentioned do not constitute a recommendation or endorsement by Dataton.
User forum https://forum.dataton.com
Knowledge Base https://knowledge.dataton.com/knowledge
If you have an issue and need to contact the support department, please visit the Help Center and submit a support ticket. https://www.dataton.com/helpcenter
Document version: 3799 2.0
TABLE OF CONTENTS
-
Warranty, Conformity and Disposal
INTRODUCTION
TABLE OF CONTENT
- Dimensions
- Power
- Start-Up Screen
- Switching Between WATCHOUT Versions
- Environmental
- Media Server Operating System
- Connectors
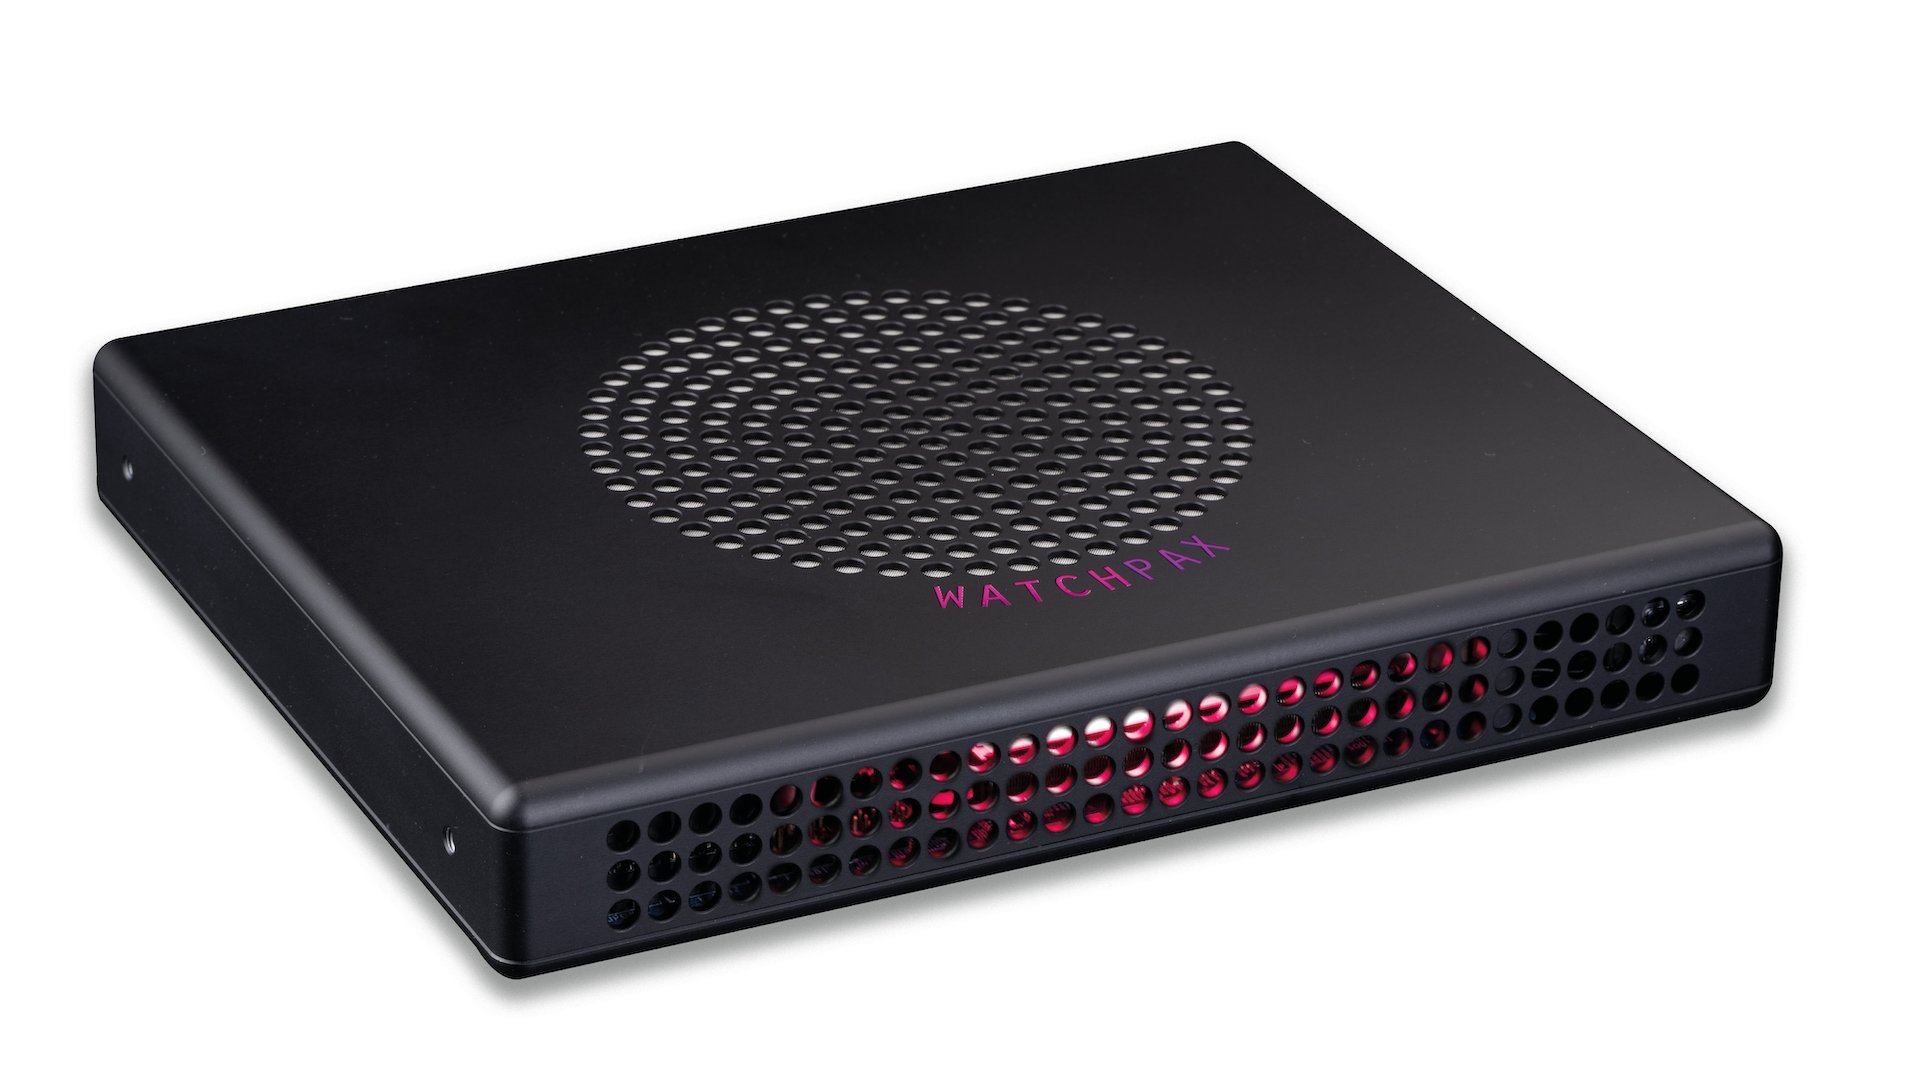
INTRODUCTION TO WATCHPAX 30
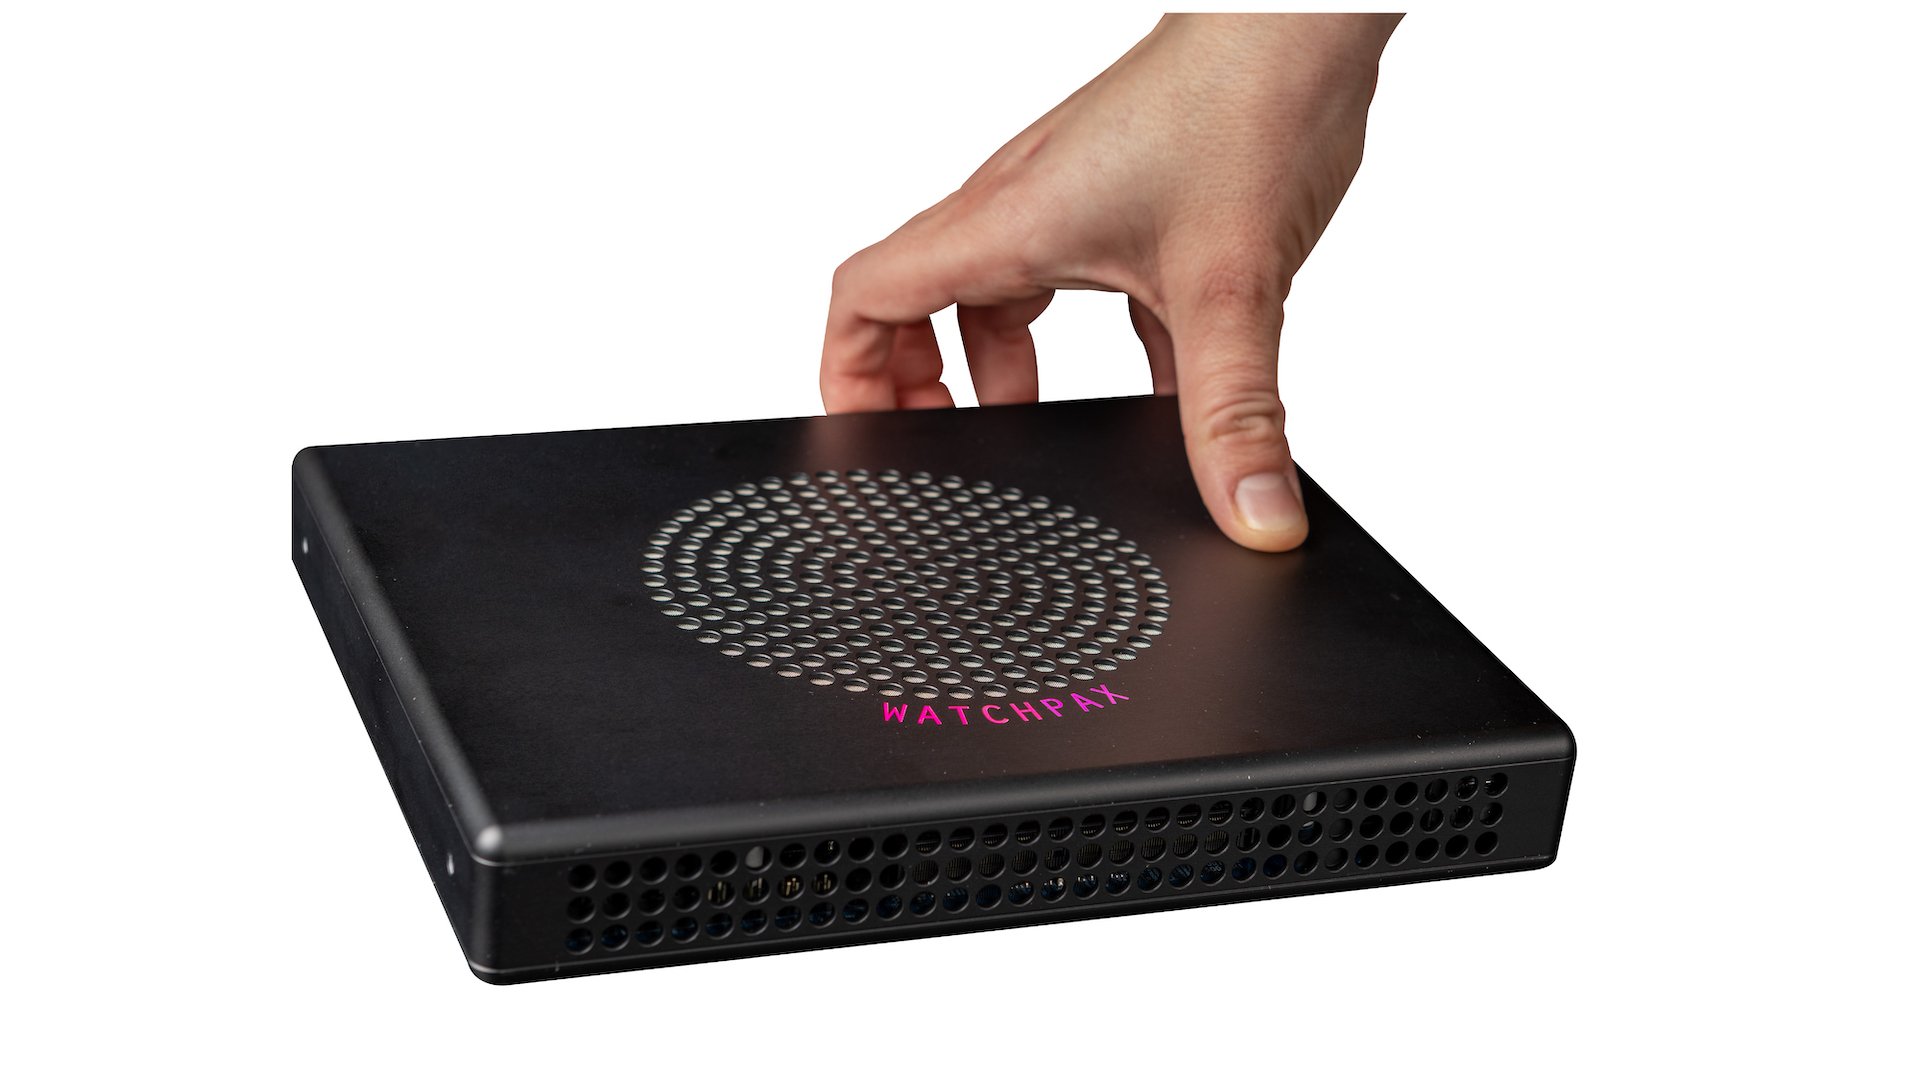
WATCHPAX 30 is a dedicated media server with four HDMI video outputs and a built-in Dataton WATCHOUT version 6 and 7 license. WATCHPAX 30 is a locked-down unit, preconfigured for playback of WATCHOUT shows only. WATCHPAX 30 has a handy compact format making it easy to transport. Other practical details include rubber bumpers and Kensington security slot.
ACCESSORIES
Included: Power cord and four EDID emulators.
DIMENSIONS
- Width 215 mm
- Height 32 mm
- Depth 176 mm
- Weight 1550 g
POWER
- IEC C6 power inlet
- Input voltage 100 – 240V AC
- Power consumption max 60 W
START UP SCREEN
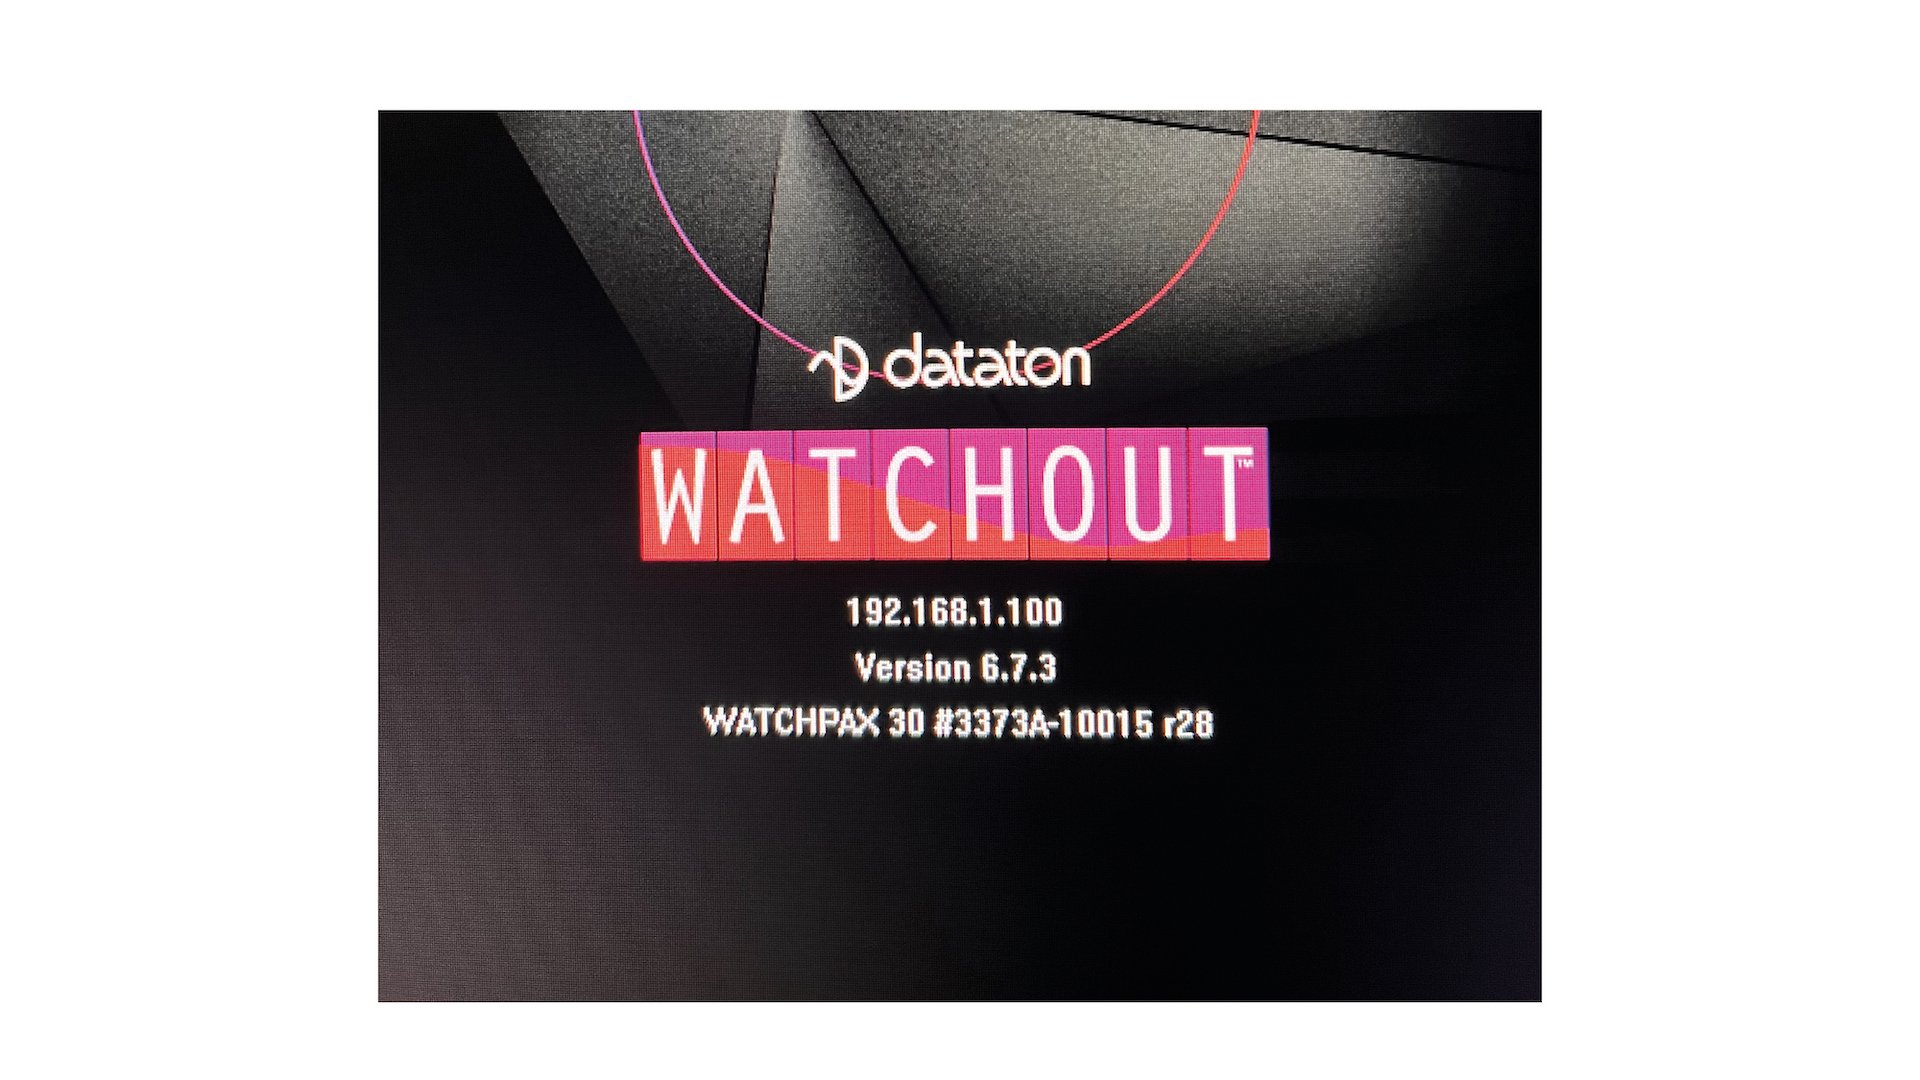
*IMPORTANT: The WATCHPAX 30 always starts up with WATCHOUT 7 as default.
This screen (Fig.2) is shown on all display devices connected to the WATCHPAX 30 at start-up with WATCHOUT 7.
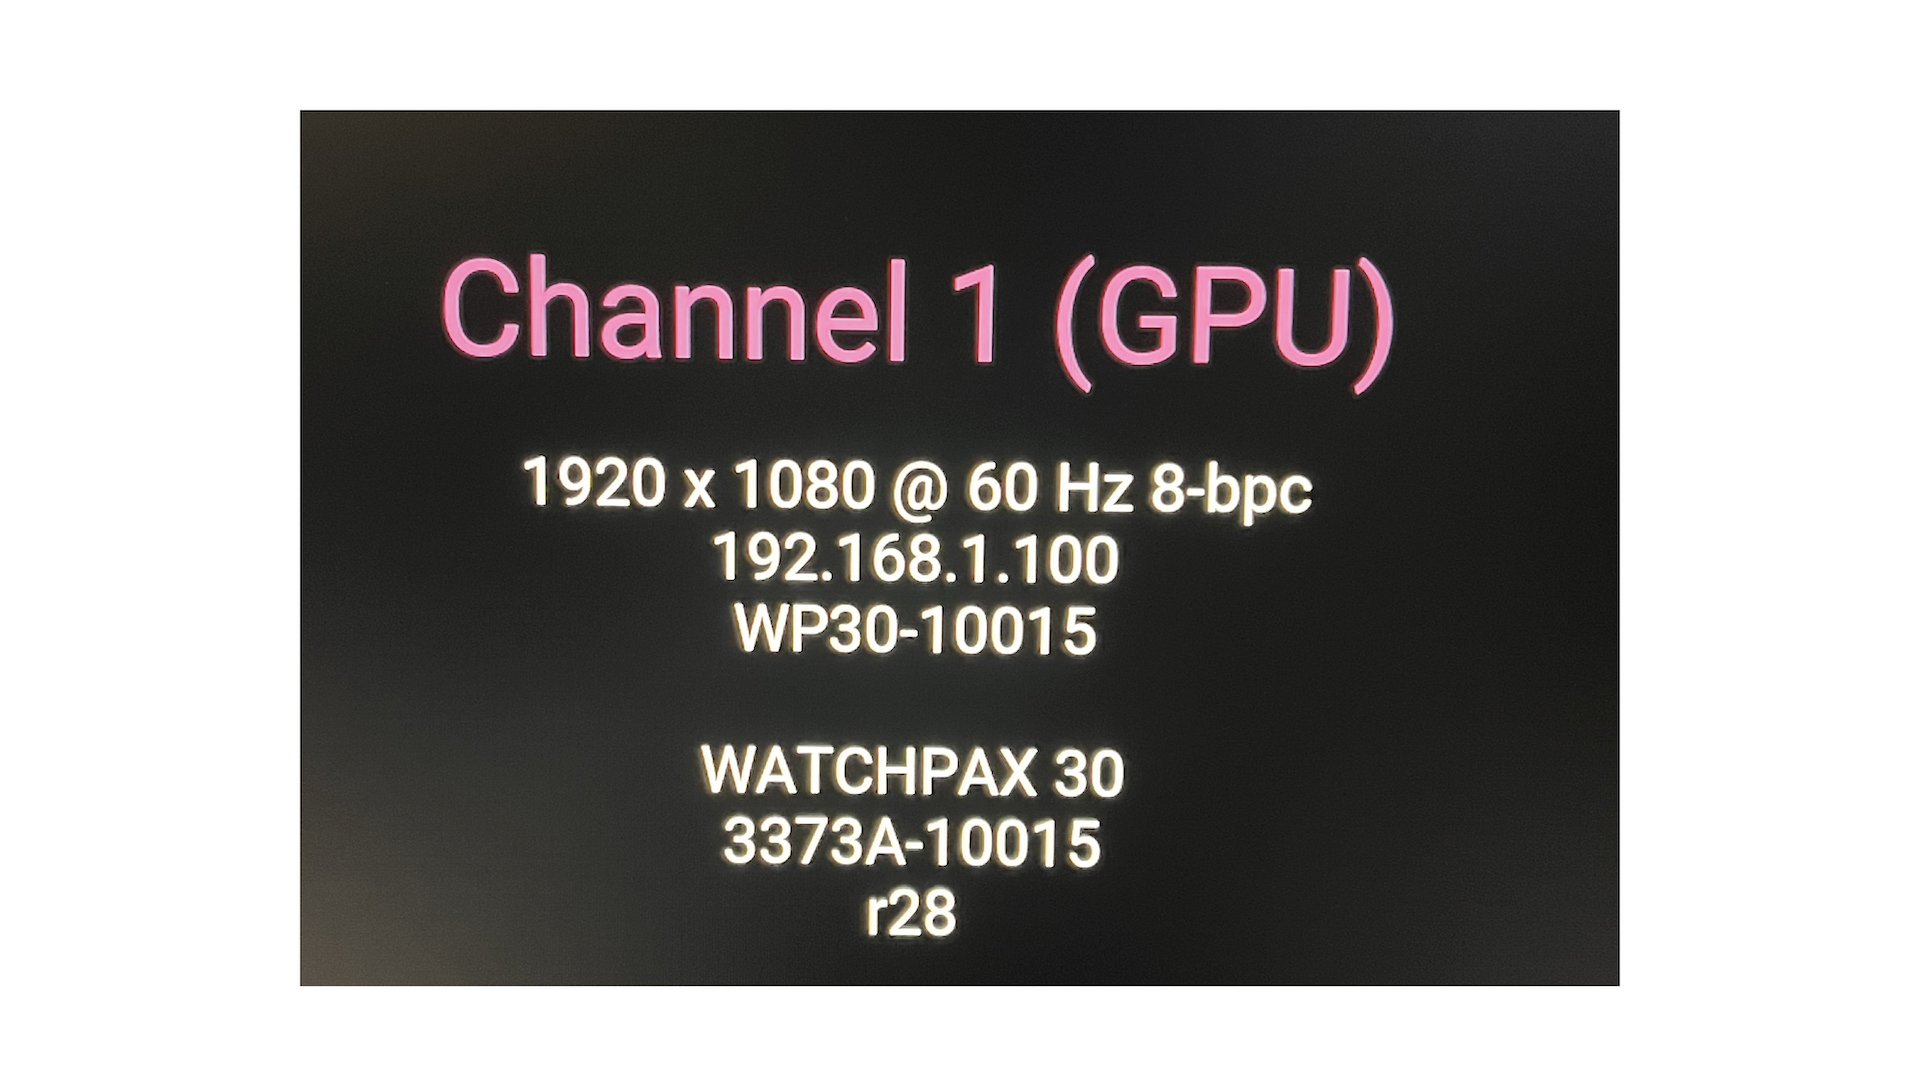
This screen below (Fig. 3) is shown on all display devices connected to the WATCHPAX 30 at start-up with WATCHOUT 6.
SWITCHING BETWEEN WATCHOUT VERSIONS
By default, WATCHPAX 30 starts in version 7 mode but you can switch to version 6, and vice versa.
From WATCHOUT 7 to WATCHOUT 6
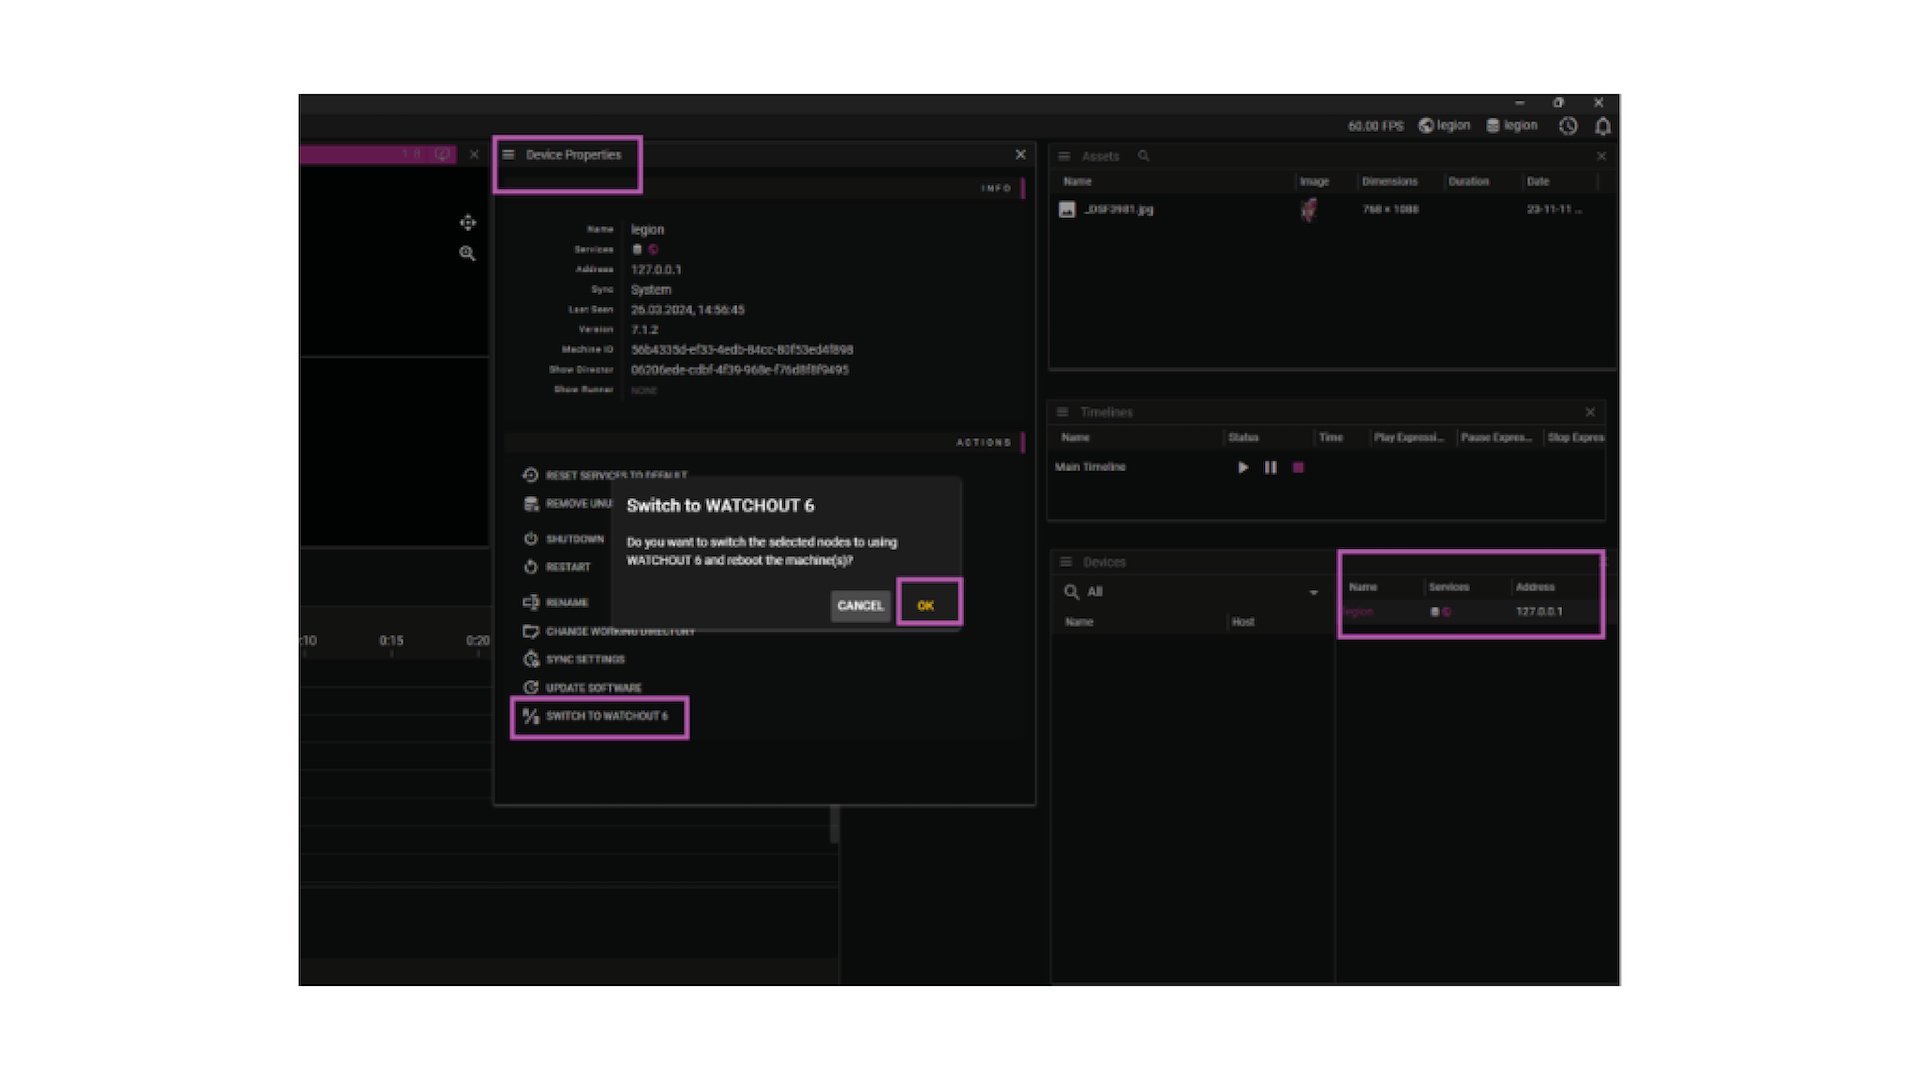
You can switch from WATCHOUT version 7 to version 6 using the Producer interface in WATCHOUT version 7.
- Connect your WATCHPAX 30 unit and open the WATCHOUT 7 Producer
- Go to the Devices window
- From the list of devices, choose your WATCHPAX
- The Device Properties window will open automatically
- Scroll down in the Device Properties window and choose “Switch to WATCHOUT 6”
- Press OK in the pop-up window to confirm
This will cause WATCHPAX to reboot and it then starts in WATCHOUT 6.
From WATCHOUT 6 to WATCHOUT 7
There are two ways to switch from version 6 on your WATCHPAX 30 to version 7: from the WATCHOUT 6 production computer or locally from the WATCHPAX media server.
From WATCHOUT 6 production computer:
- Choose one of the displays from WATCHPAX media server
- On the Stage menu, choose “Manage Display Computer” then “Remote Access”
- On the File menu, choose “Restart in WATCHOUT 7”
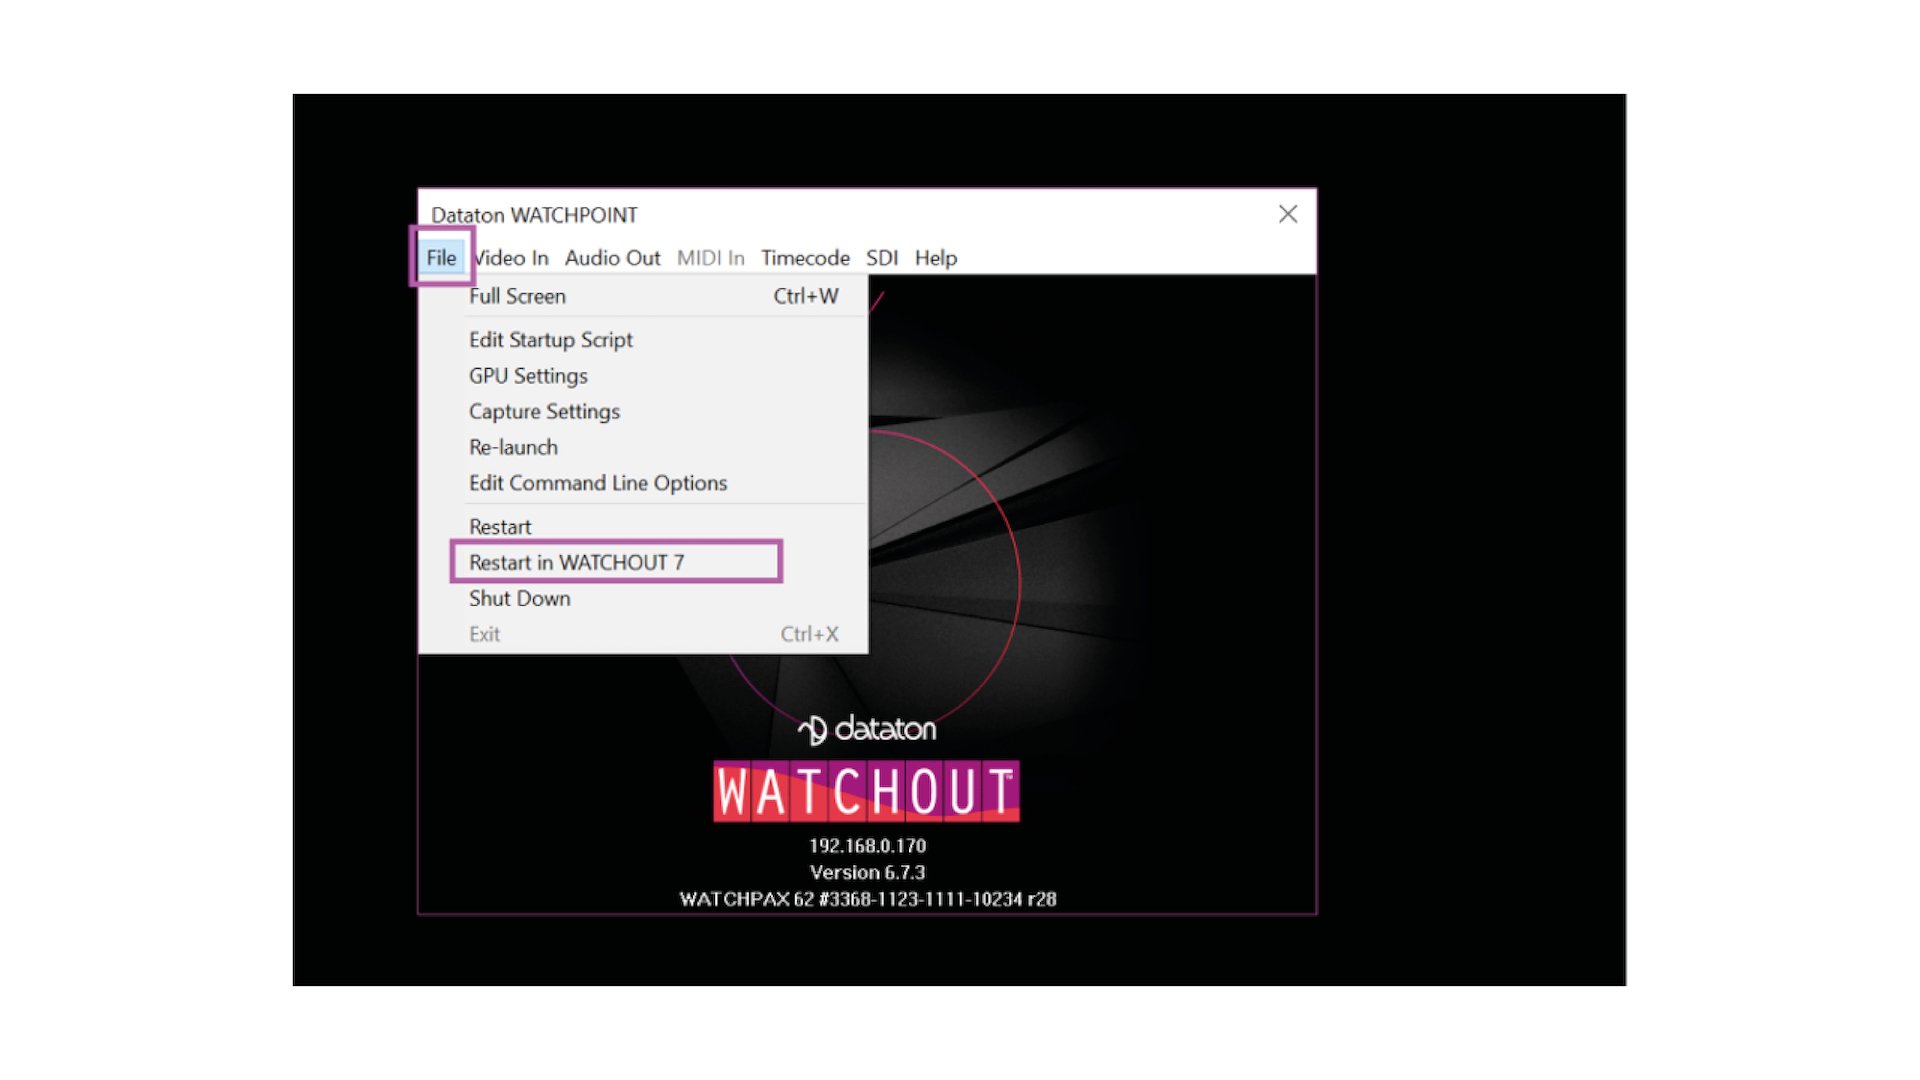
Locally from the WATCHPAX media server:
- Connect a keyboard and mouse to the USB ports and a display to a HDMI output
- Power up the server
- When you see the WATCHOUT 6 splash screen, press Ctrl+W
- On the File Menu, select “Restart in WATCHOUT 7”
This will cause WATCHPAX to reboot and it then starts WATCHOUT 7.
ENVIRONMENTAL
Temperature range
- Optimal ambient temperature range for operation 21°C to 23°C
- Operating 0°C to +35°C
- Storage and transportation -20°C to +40°C
Relative humidity
- Optimal 45% to 50%
- Operating 20% to 85 % (non-condensing)
- Storage and transportation 10% to 90% (non-condensing)
Altitude
- Operating, maximum 2000 meters above sea level
MEDIA SERVER OPERATING SYSTEM
The operating system in WATCHPAX 30 has been optimized and licensed for this specific media server configuration.
NOTE: Do not install or attempt to install any software on the locked-down media server (such as drivers, software updates, security updates, virus protection, etc). Doing so will automatically void the unit’s warranty.
For security reasons, media servers should always be installed and operate on a separate network, without access to other networks.
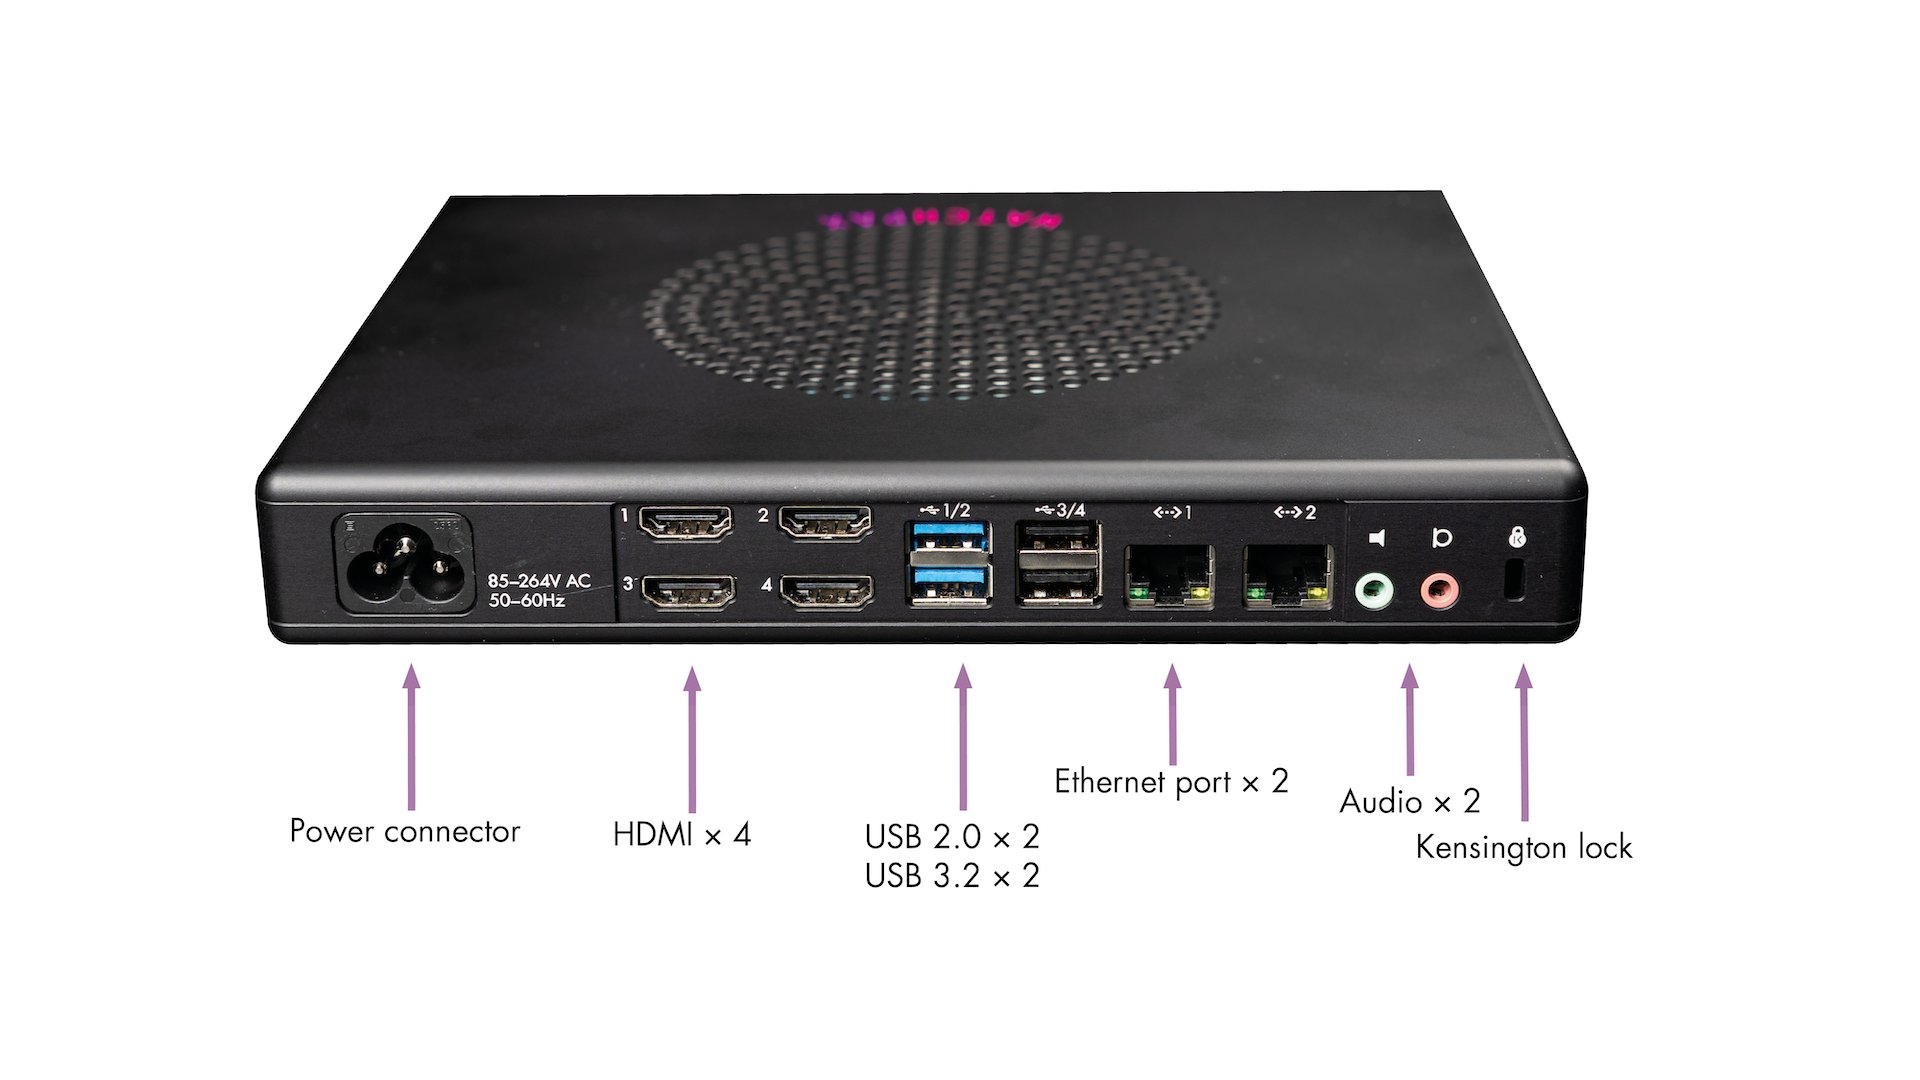
CONNECTORS
INSTALLATION AND OPERATION
TABLE OF CONTENT
BEFORE USING YOUR WATCHPAX 30
Please read the manual thoroughly before operation. Always check that the unit has not been damaged in transit when you take delivery. >IMPORTANT: The WATCHPAX 30 is a plug-and-play unit. Do not open, modify or repair the unit yourself. Opening, modifying (software or hardware) or repairing the unit yourself willl invalidate the warranty and presents a risk for the user.
SAFETY FIRST
- Insert the power plug all the way in, so it is not loose.
- Do not place the power cord or product near heat sources.
- Caution: shock hazard if handled carelessly or inaccurately.
- The unit shall be connected to a grounded outlet.
- Do not use a damaged power cord or plug.
- Do not touch the power plug with wet hands.
- Do not install the product in a narrow space and/or where there is bad ventilation. Do not block the ventilation in any way when operated.
- Always keep plastic packaging away from children.
- Do not install the product on an unstable or vibrating surface.
- Install the unit in a clean, dry area without excessive particles or dust, in the air (preferably in an air-conditioned server room). Do not install the product in a place where it is exposed to high temperature, chemicals, dust, moisture, oil or smoke as this may seriously affect its performance and lifetime.
- Take care not to drop the product when moving it.
- When installing the product on a shelf, ensure the bottom edge of the product does not protrude to avoid tipping, for example.
- To move the product, first disconnect all the cables from it.
- The wall socket should be easily accessible for pluggable equipment.
- High voltage runs through the product. Do not attempt to disassemble, repair, or modify the product on your own.
- If the product generates a burning smell, or smoke, remove the power cords immediately and contact Dataton.
- If the product falls, or the exterior is damaged, power off the product, remove the power cords and contact Dataton.
- If there is a risk of thunderstorm or lightning strike, turn off the power and disconnect all cables.
- Do not insert a metallic object or inflammable object into any opening of the product.
- Unplug this product from the AC power supply before cleaning. Do not use liquid or aerosol cleaners on the product. Use a microfiber cloth for cleaning.
- After storage in cold conditions, let the product adapt to normal temperature for two hours before powering on.
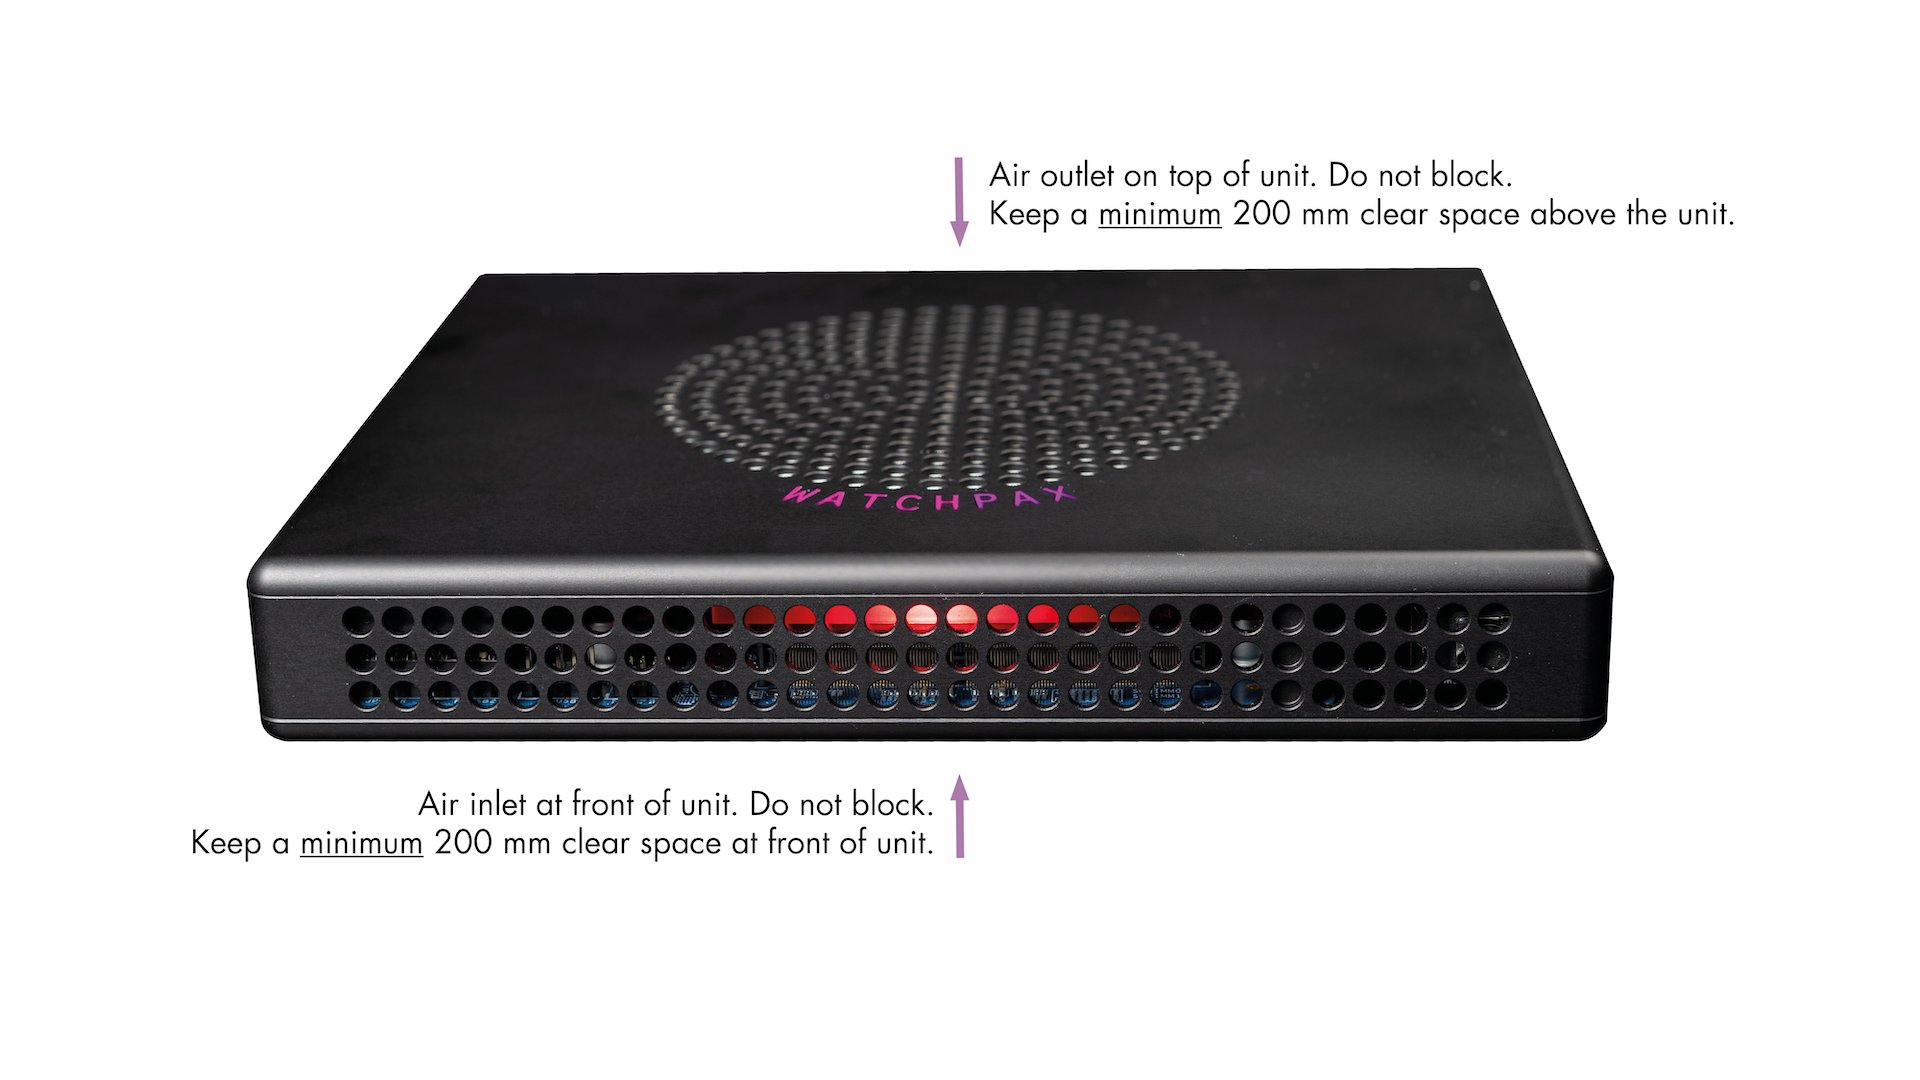
VENTILATION
Airflow is critical for the correct operation of WATCHPAX 30. Do not stack units or place any items on top of the WATCHPAX 30.
In any installation, there should always be a minimum of 200 mm clear space at front and 200 mm above the unit.
INSTALLATION
GENERAL
- This equipment is for professional use for installation at locations where only adults are normally present. Check the “Safety First” list before use.
- The WATCHOUT 30 must be connected to a properly grounded wall socket (a socket-outlet with protective earth connection in the building).
- The serial number is located on the base of the unit.
IMPORTANT: Only use the power cord supplied with the WATCHPAX 30 unit, otherwise Dataton AB cannot guarantee full functionality.
STANDALONE INSTALLATION
Place the unit flat on its base. The base is the side of the unit showing the serial number and Dataton logo.
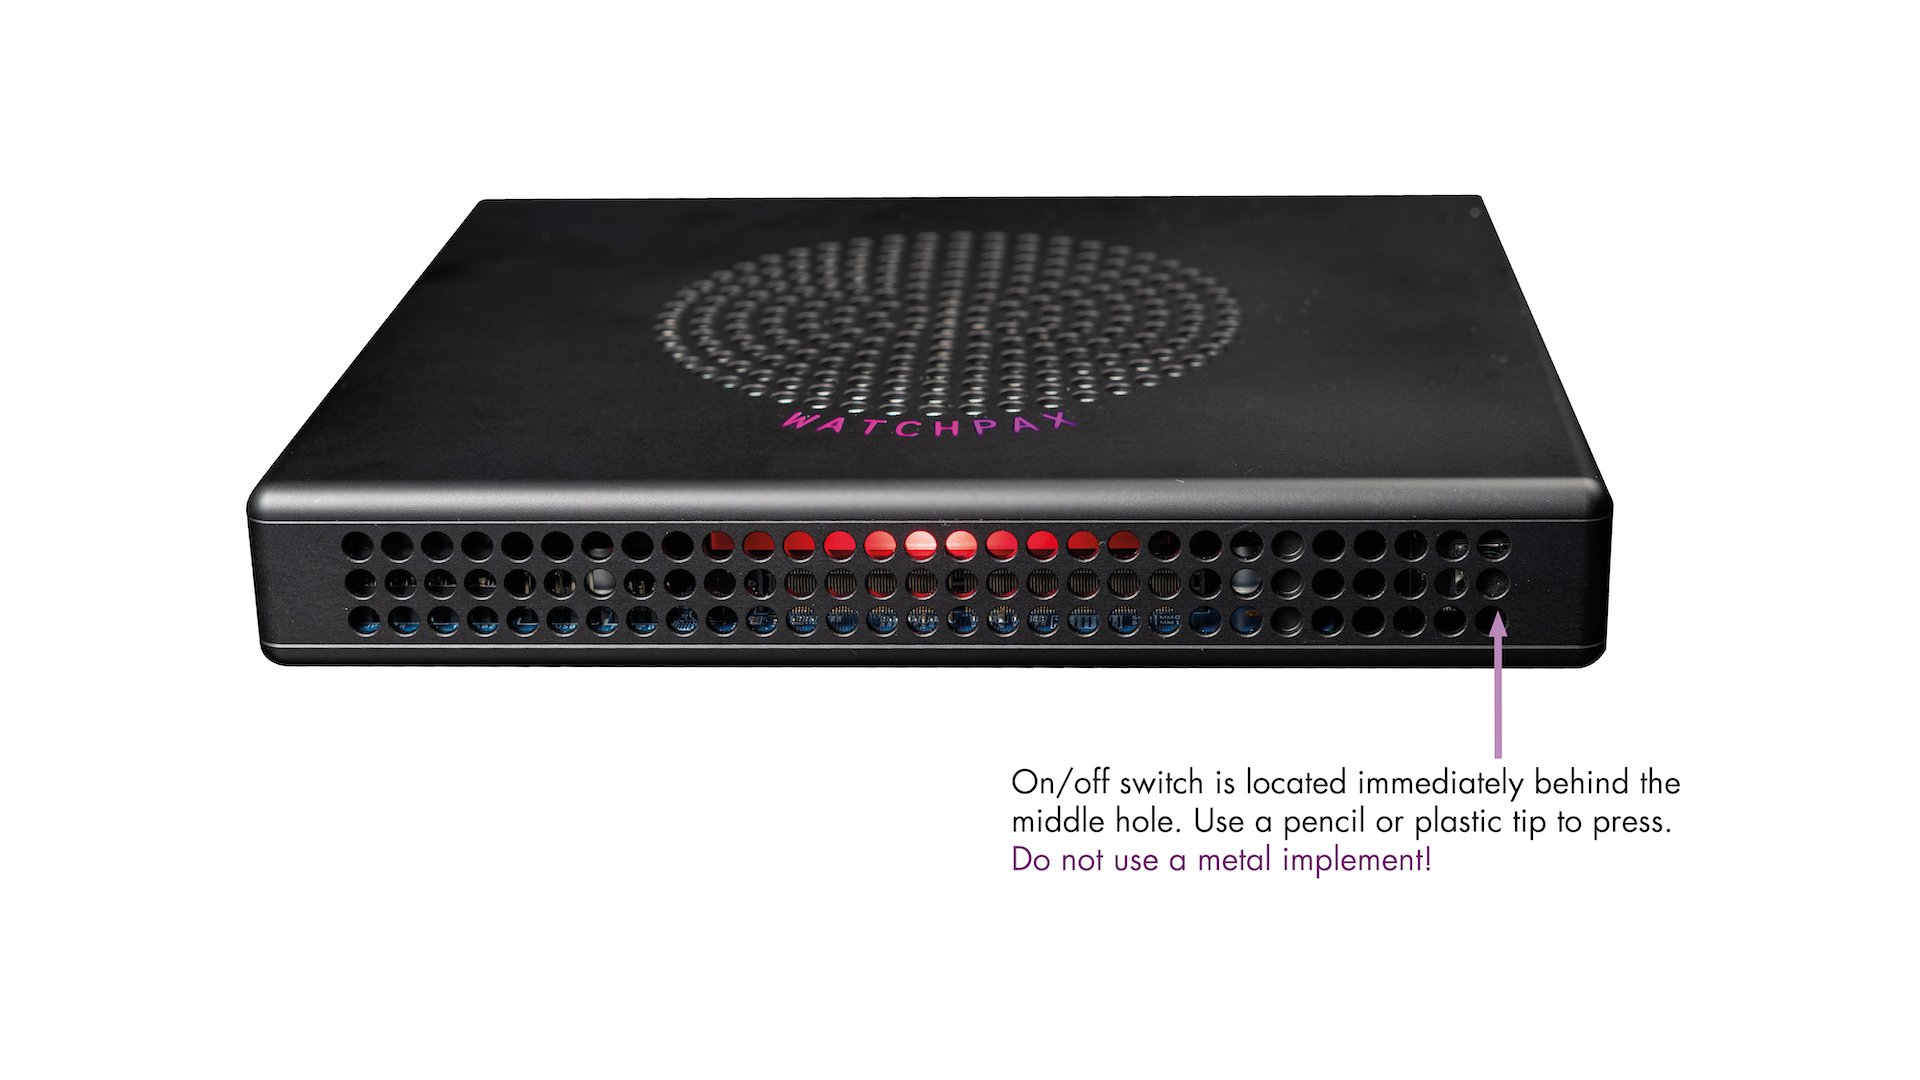
POWER ON
The unit is switched on by inserting the power cord or inserting the power cord and using the on/off switch. The discreet on/off switch is located behind the front plate of the WATCHPAX 30 (see Connectors in the Introduction). >IMPORTANT: Use a pencil or similar insulated tool to press the on/off switch. Do not use a metal implement.
FIRST POWER ON
The first time you power up a WATCHPAX 30 (after delivery or after a reset) the system will finalize installation and reboot several times. This procedure will typically take about 5 minutes to complete.
>IMPORTANT: Do not interrupt this procedure.POWER OFF
Powering down should be initiated from within WATCHOUT production/Producer software or by using the on/off switch.
When the power-off sequence is complete, the fans will turn off, and the power cord may be removed.
NOTE: If you need to perform a forced shutdown, unplug the power cord to turn off the unit.
QUICK START
- Connect displays to the WATCHPAX 30 using the HDMI outputs.
- Connect the WATCHPAX 30 to the network using the Ethernet port.
- Power up the WATCHPAX 30.
- Start WATCHOUT software on the production computer which is on the same network. Make sure you are using WATCHOUT version 7, or WATCHOUT version 6.7.3, or higher.
RESET WATCHPAX 30
There are occasions when you may want to reset a WATCHPAX 30, for example, if the unit has been corrupted, or if it is a rental unit and user-specific info has to be removed between rentals. There are two levels of reset:
- Reset and keep user data. This resets the operating system, display, GPU and capture settings but retains user data, such as shows and media.
- Reset to factory settings. This takes the unit all the way back to the original factory settings and you lose all user data.
IMPORTANT: A reset, regardless of level, is an advanced measure. Make sure you are fully aware of what data you lose when you reset!
RESET AND KEEP USER DATA
This option resets the system partitions but keeps all user data such as:
- Shows
- Media
- WATCHOUT settings
- Startup script
- Network settings
- Timecode settings
Driver-related settings will be reset to default factory settings such as:
- Display settings
- Display mode
RESET TO FACTORY SETTINGS
This resets all partitions to factory settings and all user data will be lost. This level of reset is suitable when you want to remove all settings between projects.
RESET PROCEDURE
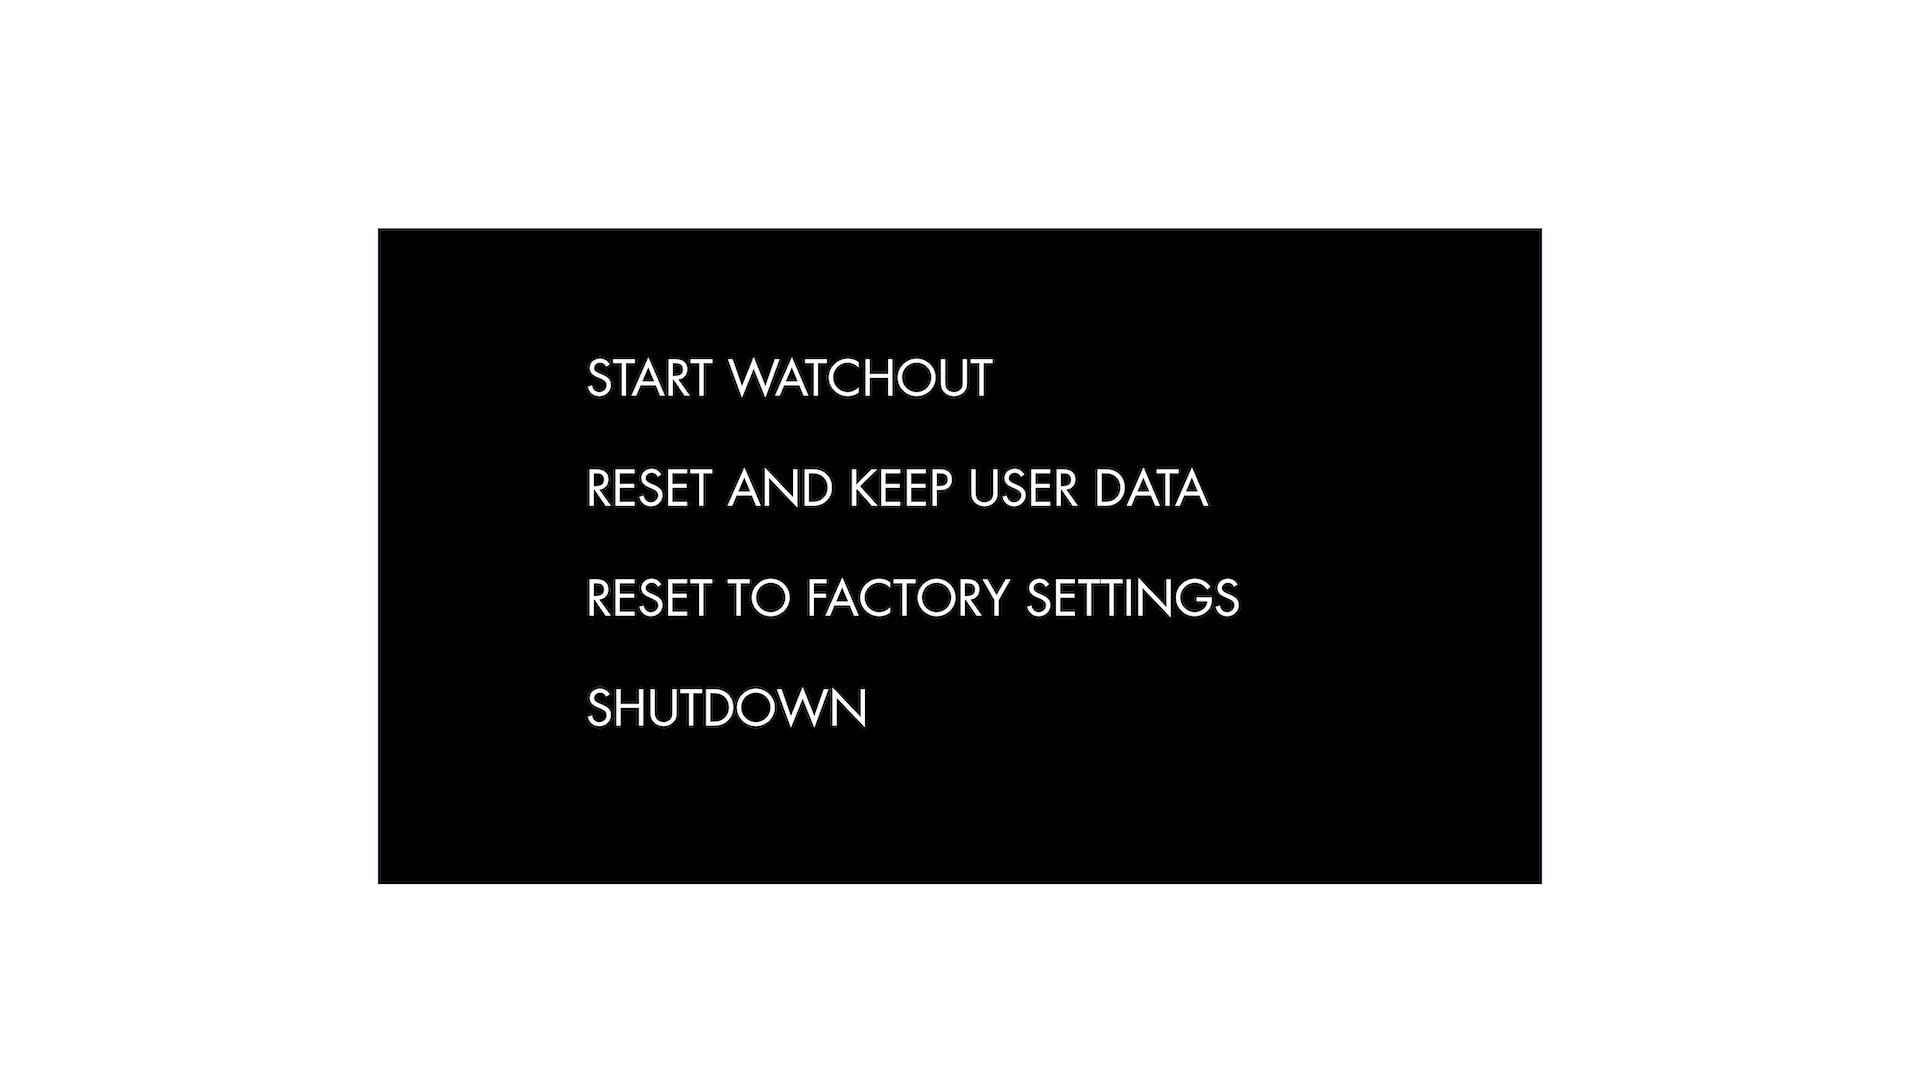
The reset menu is hidden by design in order to avoid accidental resets or misuse. To reset your WATCHPAX 30 device, follow these steps:
- Power off the WATCHPAX 30.
- Disconnect any USB devices.
- Now connect a keyboard to one of the USB ports.
- Connect at least one display device to an HDMI output.
- Power on the WATCHPAX 30.
- During startup, you will see a five-second countdown in the top left corner of the display. Press Esc during this countdown.

NOTE: If you don’t see a counter, it means the display device is slow to lock to the output. In that case, press Esc repeatedly after power-on to move to the menu below.
- Select the desired reset option in the menu that appears, and press Enter. >IMPORTANT: There will be no confirmation – the reset process starts immediately!
- As noted above, the reset process starts immediately, providing some visual feedback.
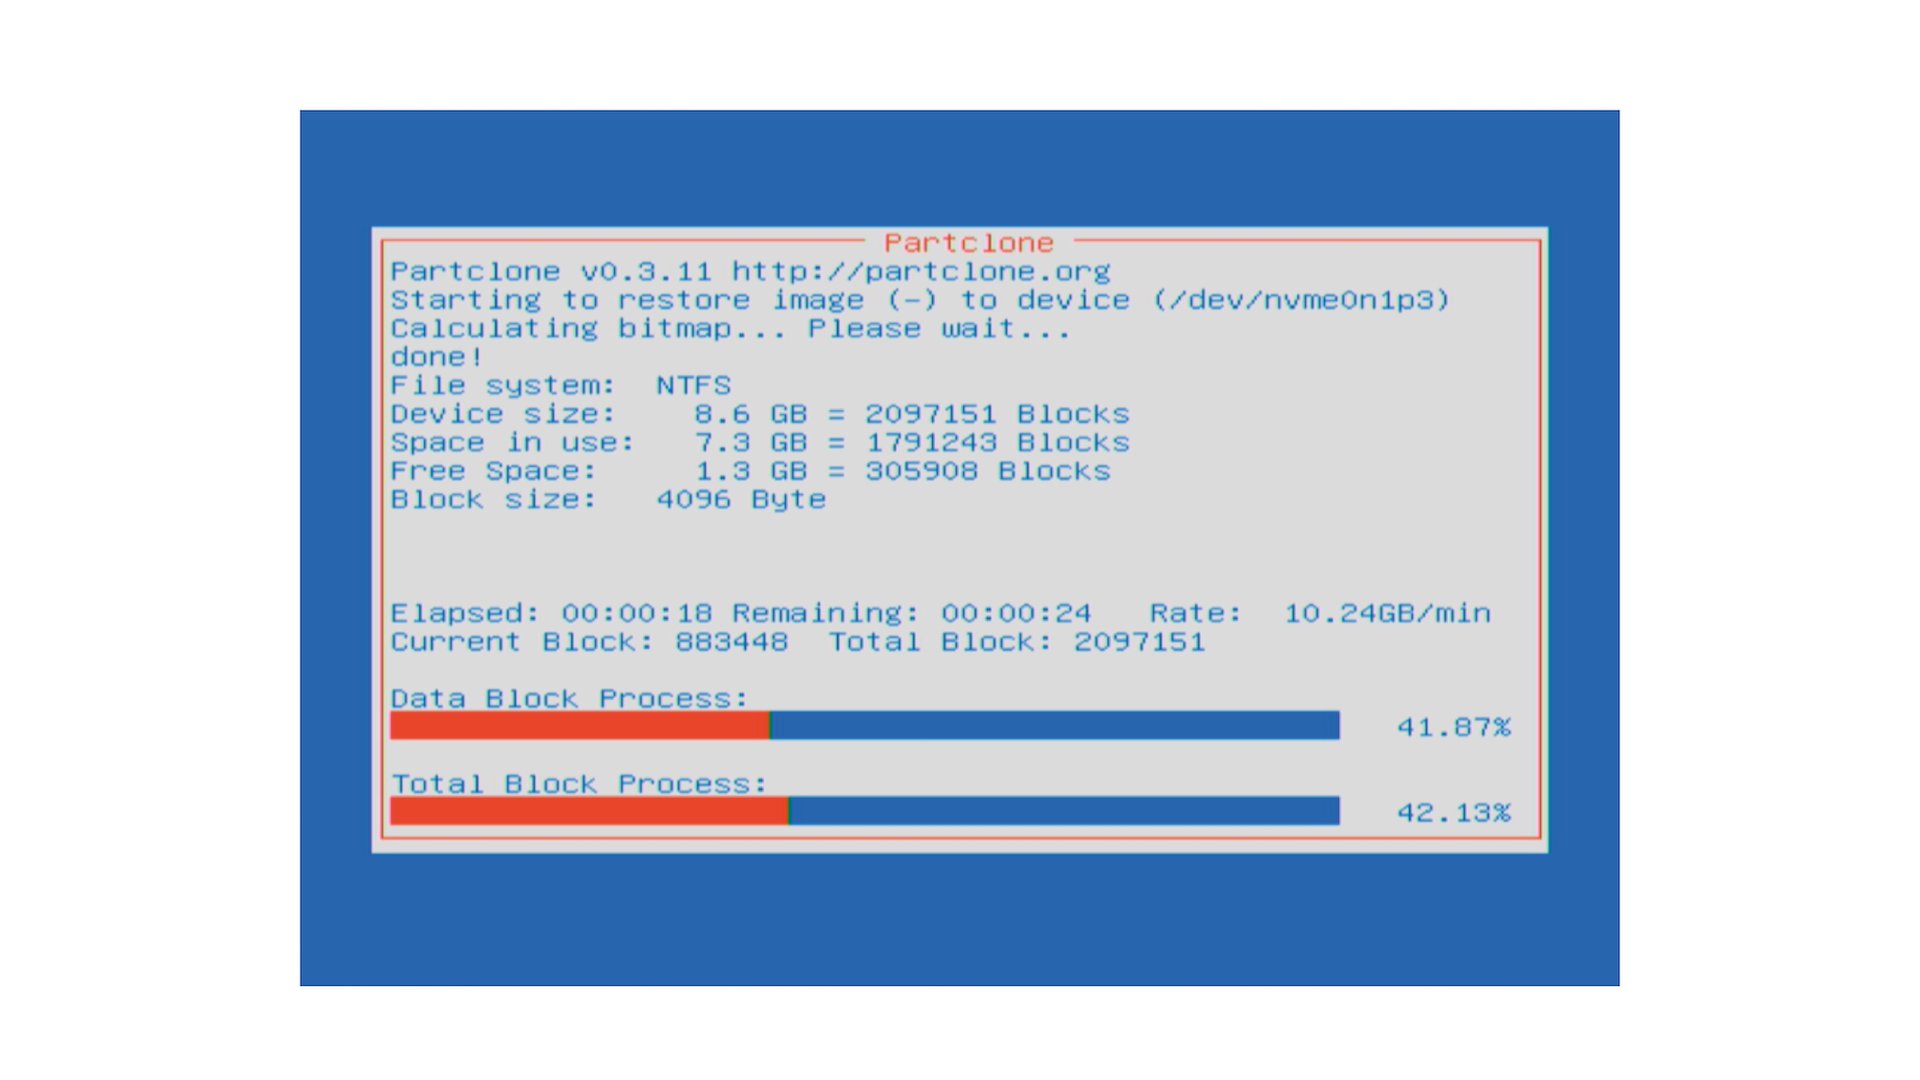
- The WATCHPAX 30 will restart several times in order to configure the operating system and hardware.

IMPORTANT: Do not power off the unit during the configuration process!
- WATCHOUT will start when the process is complete. The system image version will be appended after the serial number.

EDID EMULATORS
TABLE OF CONTENT
EDID
Extended Display Identification Data (EDID) is a standardized data format for a display, such as a projector, screen or monitor, to describe its performance capability to a video source (in this case, WATCHPAX 30). The information exchanged in an EDID handshake includes the resolution, refresh rates and timings available in the display.
INSTALLATION
Plug the emulator directly to the HDMI outputs on the back of the WATCHPAX 30. Connect the display’s cable to the emulator. The emulator will be in default mode. Please note: If you change the resolution to one supported by the emulator, but not by the display, the display will not work.
TURN ON BACKUP MODE
Disconnect the cable between the display and the emulator. The emulator will turn on backup mode and its LED will start flashing. When backup mode is turned on, two different modes can be selected:
- Copy display EDID while the LED is flashing, connect the display to the emulator. The emulator will copy the EDID data. The data will be permanently stored in the emulator, even when it is removed from the video source.
- Reset the emulator to default settings while the LED is flashing, do not connect anything to the emulator. The LED will stop flashing after 10 seconds, and the emulator will recover to the default factory settings.
IMPORTANT: When the emulator is connected to the running WATCHPAX 30, do not unplug the connected monitor cable, otherwise the stored EDID data can be erased.
VESA BLOCK ESTABLISHED TIMINGS I 720 x 400 @ 70Hz IBM, VGA 640 x 480 @ 60Hz IBM, VGA 640 x 480 @ 67Hz Apple, Mac II 640 x 480 @ 72Hz VESA 640 x 480 @ 75Hz VESA 800 x 600 @ 56Hz VESA 800 x 600 @ 60Hz VESA
VESA BLOCK ESTABLISHED TIMINGS II 800 x 600 @ 72Hz VESA 800 x 600 @ 75Hz VESA 832 x 624 @ 75Hz Apple, Mac II 1024 x 768 @ 60Hz VESA 1024 x 768 @ 70Hz VESA 1024 x 768 @ 75Hz VESA 1280 x 1024 @ 75Hz VESA
VESA BLOCK MANUFACTURER'S TIMINGS 1152 x 870 @ 75Hz Apple, Mac II
VESA BLOCK STANDARD TIMINGS 1152 x 864 @ 75 Hz 4:3 1280 x 1024 @ 60 Hz 5:4 1280 x 960 @ 60 Hz 4:3 1440 x 900 @ 60 Hz 16:10 1600 x 1200 @ 60 Hz 4:3 1680 x 1050 @ 60 Hz 16:10 1920 x 1080 @ 60 Hz 16:9 1920x1200 @ 60 Hz 16:10
VESA BLOCK DETAILED TIMINGS 1920 x 1080 @ 60Hz 3840 x 2160 @ 30Hz 2560 x 1600 @ 60Hz
CEA BLOCK 3840 x 2160p @ 60Hz 3840 x 2160 @ 24Hz 16:9 1920 x 1080p @ 59.94/60Hz HDTV (16:9, 1:1) 1920 x 1080i @ 59.94/60Hz HDTV (16:9, 1:1) 1280 x 720p @ 59.94/60Hz HDTV (16:9, 1:1) 720 x 480p @ 59.94/60Hz EDTV (16:9, 32:27) 720 x 480p @ 59.94/60Hz EDTV (4:3, 8:9) 640 x 480p @ 59.94/60Hz EDTV (4:3, 1:1) 720 x 576p @ 50Hz EDTV (4:3, 16:15) 720 x 576p @ 50Hz EDTV (16:9, 64:45) 1280 x 720p @ 50Hz HDTV (16:9, 1:1) 1920 x 1080i @ 50Hz HDTV (16:9, 1:1) 1920 x 1080p @ 50Hz HDTV (16:9, 1:1) 1440 x 480p @ 59.94/60Hz 4:3, 4:9, 8:9 1440 x 480p @ 59.94/60Hz 16:9, 16:27, 32:27 1440 x 576p @ 50Hz 4:3, 8:45, 16:15 1440 x 576p @ 50Hz 16:9, 32:45, 64:45 720 (1440) x 480i @ 59.94/60Hz SDTV (4:3, 8:9) 720 (1440) x 480i @ 59.94/60Hz SDTV (16:9, 32:27) 720 (1440) x 576i @ 50Hz SDTV (4:3, 16:15) 720 (1440) x 576i @ 50Hz SDTV (16:9, 64:45) 2560 x 1440 @ 60Hz 16:9 1920 x 1200 @ 60Hz 16:9 1920 x 1080 @ 60Hz 16:9 WARRANTY, CONFORMITY AND DISPOSAL
TABLE OF CONTENT
LIMITED WARRANTY
DATATON AB (”Dataton”) DATATON AB (”Dataton”) warrants this hardware product against defects in materials and workmanship for a period of seven hundred and thirty (730) days from the date of original retail purchase.
If you discover a defect, Dataton will, at its option, repair, replace, or refund the purchase price of this product at no charge to you, provided you return it during the warranty period, in the original packaging, transportation charges pre-paid, to the authorized Dataton vendor from whom you purchased it, any other authorized Dataton sales point in the country of the original retail purchase or to Dataton itself. More information is available from Dataton AB, see address.
When returning an item, you are advised to first contact the vendor or Dataton. You should then fill in the RMA (Return Merchandise Authorization) form available on www.dataton.com stating your name, address, contact details, a description of the problem, serial numbers and point of purchase. Dataton also requires a copy of the bill of sale or packing list bearing the appropriate Dataton serial numbers (where applicable) as proof of the date of original retail purchase.
This warranty applies only to hardware products manufactured by Dataton AB which are labeled with the Dataton logo and returned in the original packaging. This warranty does not apply if the product has been damaged by accident, abuse, misuse or misapplication, nor if the product has been opened or modified without the written permission of Dataton, nor if any serial number has been removed or defaced.
All implied warranties, including implied warranties of merchantability and fitness for a particular purpose, are limited in duration to seven hundred and thirty (730) days from the date of original retail purchase of this product. The warranty and remedies set forth above are exclusive and in lieu of all others, oral, written, express or implied.
No Dataton dealer, agent or employee is authorized to make any modification, extension or addition to this warranty (see note on extended warranty below).
Dataton is not responsible for special, incidental or consequential damages resulting from any breach of warranty, or under any legal theory, including lost profits, downtime, goodwill, damage to or replacement of equipment and property, and any costs of recovering, reprogramming or reproducing any program or data stored in or used with Dataton products.
If extended warranty terms have been agreed with Dataton at purchase, proof shall be presented.
Dataton AB • Teknikringen 22 • SE 583 30 LINKÖPING • Sweden
Email: [email protected]
DECLARATION OF CONFORMITY
Model number: 3373
Description: Media player/display server
Responsible manufacturer: Dataton AB
Address: Teknikringen 22, SE-583 30 Linköping, Sweden
Dataton AB hereby declares that the product listed above, to which this Declaration of Conformity relates, adheres to the directives below and is in conformity with the standards listed below:
FCC – Complies with
- FCC Part 15, subpart B
- Industry Canada ICES-003, Issue 7
CE – Complies with
- EN 55032:2015 +A11:2020
- EN 55035:2017 +A11:2020
- EN 61000-3-2:2019 +A1:2021
- EN 61000-3-3:2013 +A1:2019 +A2:2021
- VCCI-CISPR 32:2016 Class A, CISPR 16-2-1:2017, Ed.3.1
- VCCI-CISPR 32:2016 Class A, CISPR 16-2-3:2019, Ed.4.1
Safety – Complies with
- IEC 62368-1:2014
- IEC 62368-1:2018
- IEC 62368-3:2017
- EN 62368-1:2014 +A11:2017
- CSA C22.2 No. 62368-1:2014
- UL 62368-1 Ed.2
- J62368-1 (2020)
- AS/NZS 62368.1:2018
RoHS – Complies with
- RoHS Directive 2011/65/EU
WEEE – Complies with
- Directive 2012/19/EU
Linköping, April, 2024
Björn Sandlund Chairman of the Board
DISPOSAL
Only for European Union and EEA (Norway, Iceland and Liechtenstein)
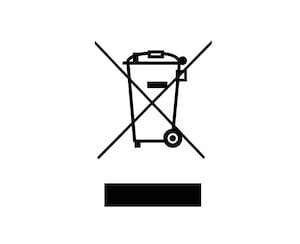
This symbol indicates that this product is not to be disposed of with your household waste, according to the WEEE Directive (2012/19/EU), the Battery Directive (2006/66/EC) and/or national legislation implementing those Directives. If a chemical symbol is printed beneath the symbol shown above, in accordance with the Battery Directive, this indicates that a heavy metal (Hg = Mercury, Cd = Cadmium, Pb = Lead) is present in this battery or accumulator at a concentration above an applicable threshold specified in the Battery Directive.
This product should be handed over to a designated collection point, e.g., on an authorized one-for-one basis when you buy a new similar product or to an authorized collection site for recycling waste electrical and electronic equipment (EEE) and batteries and accumulators. Improper handling of this type of waste could have a possible impact on the environment and human health due to potentially hazardous substances that are generally associated with EEE. Your cooperation in the correct disposal of this product will contribute to the effective usage of natural resources.
For more information about the recycling of this product, please contact your local city office, waste authority, approved scheme or your household waste disposal.